The Problem with Old Kitchen Cabinets (And Why You’re Not Alone)
When my family moved into our 1978 ranch-style house, the first thing my mom said when she walked into the kitchen was: ‘Oh no.’ And honestly? Same.
The original cabinets were this dark, honey-oak monstrosity with that classic 1970s raised-panel look. The hardware was brass — not the cool, trending brass, but the dingy, scratched kind that made everything look like it was decorated in a hurry during the Carter administration. The upper cabinets went almost to the ceiling and were so deep you needed a stepladder to retrieve anything from the back.
We couldn’t afford a full renovation. Not even close. But we couldn’t just live with that kitchen either. So began a two-year experiment in kitchen decor for older homes with ugly original cabinets — and I’m going to share everything we learned, including the things that totally flopped.
The good news? You have way more options than you think. And no, you don’t have to gut the whole kitchen to make it look like something you actually enjoy spending time in.
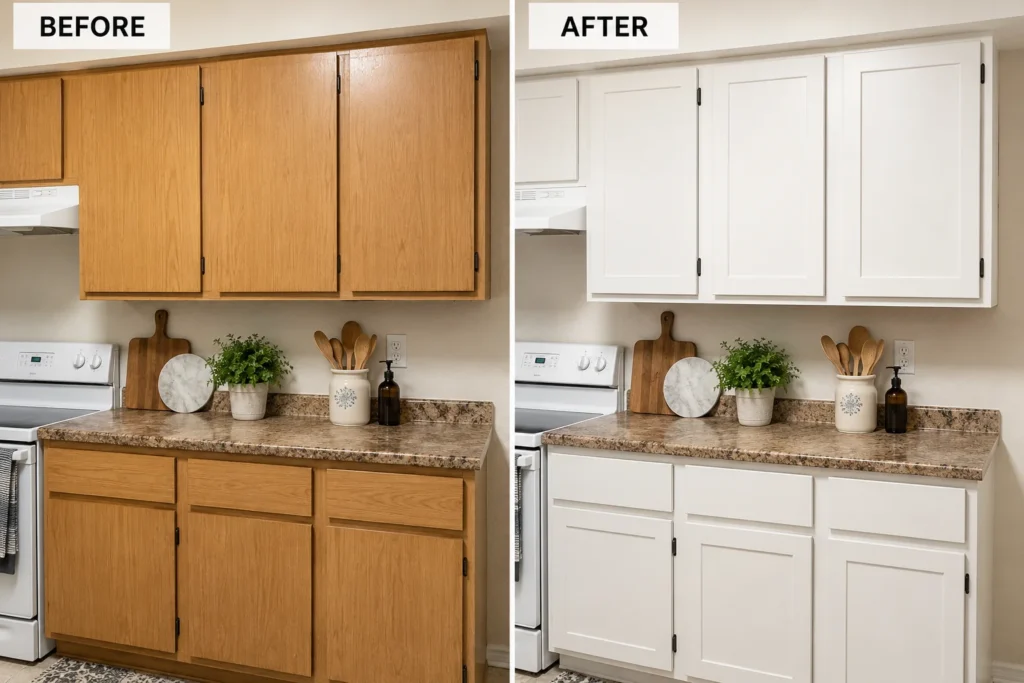
Idea 1: Paint Everything a Contrasting Color
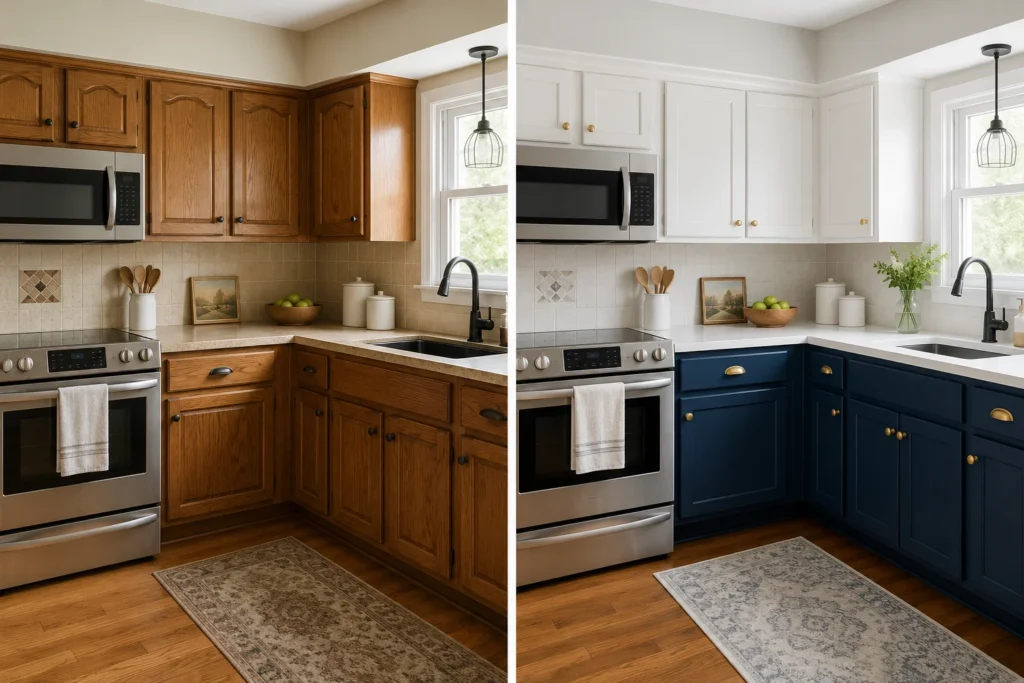
This is the one everybody says and everybody’s scared to actually do. But painting your kitchen cabinets is genuinely the highest-impact, lowest-cost move you can make.
We painted our lower cabinets a deep forest green (we used Sherwin-Williams Billiard Green) and kept the uppers white. The result was dramatic — suddenly the kitchen looked intentional. The cabinets didn’t disappear, but they became a feature instead of an eyesore.
What you’ll need:
- A good deglosser (TSP substitute works great)
- Zinsser BIN primer (oil-based, sticks to anything)
- Semi-gloss or satin paint — never flat on cabinets
- A small foam roller + quality brush for detail work
- Cabinet paint from Benjamin Moore Advance or Sherwin-Williams Emerald Urethane
One mistake we made early on: skipping the deglosser step because we were impatient. Don’t do that. The paint will peel within six months.
Pro tip: Leave the doors off for a few days while the paint cures fully before rehanging.
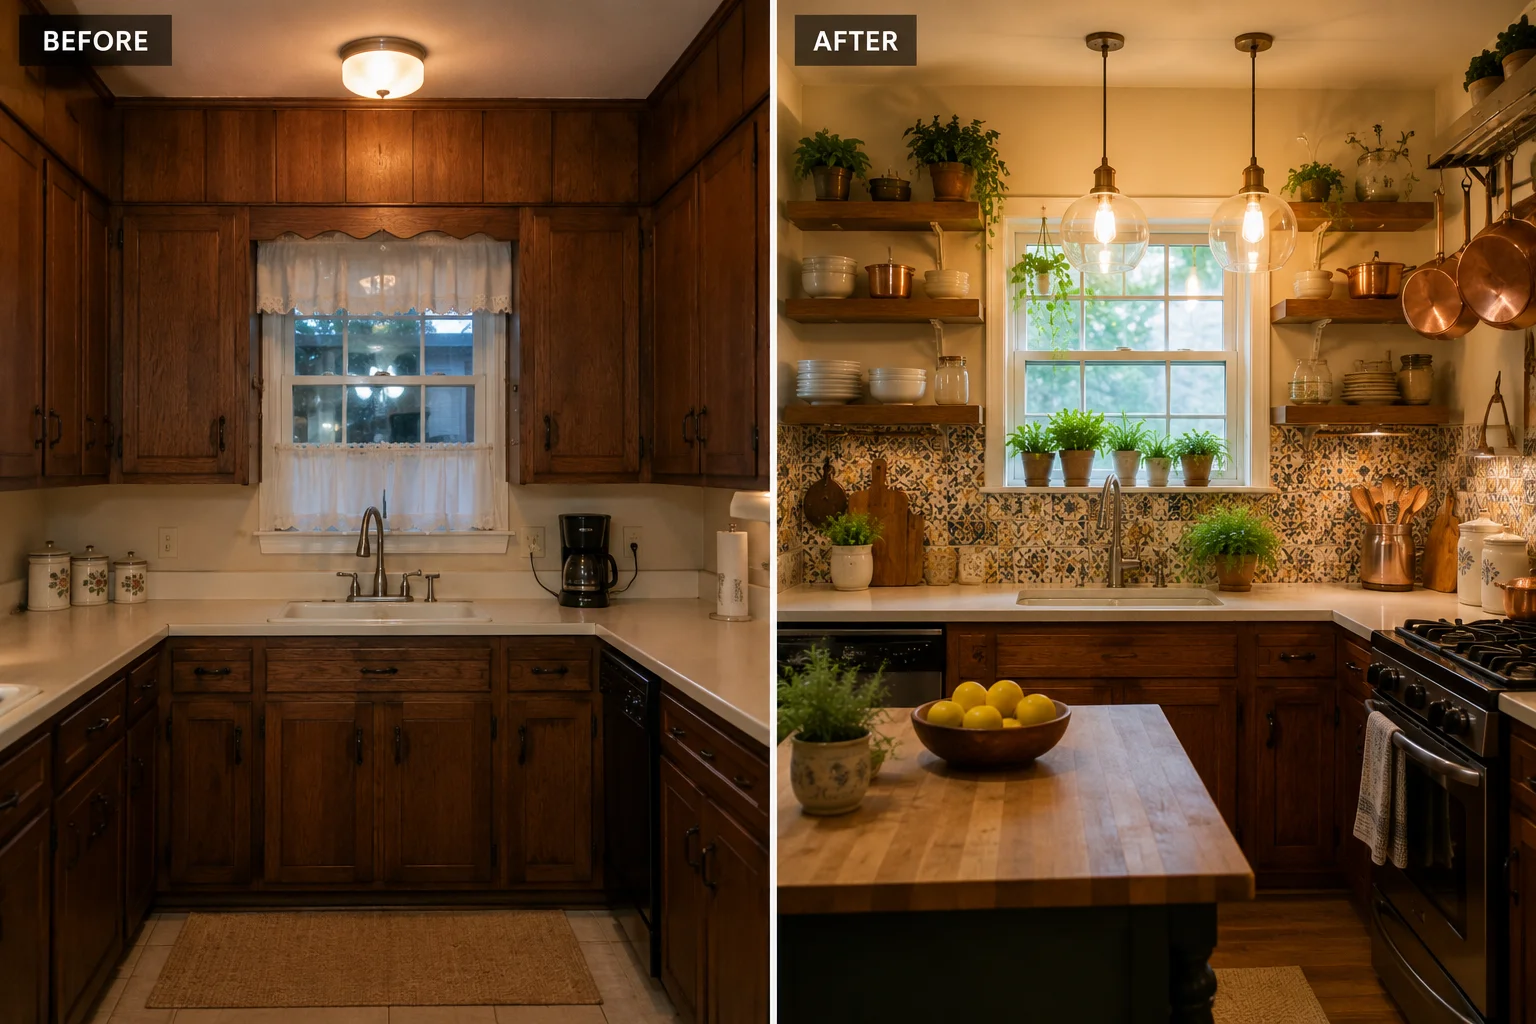
Idea 2: Add Open Shelving Alongside the Ugly Ones
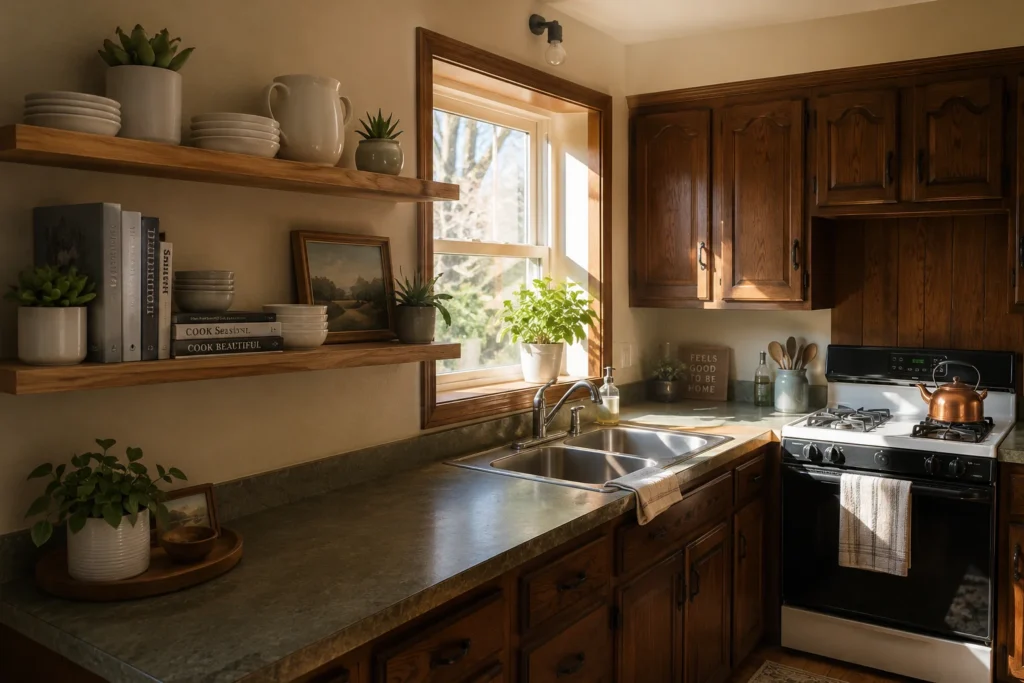
Here’s something clever: you don’t have to fix what’s ugly — sometimes you just redirect attention somewhere else.
We installed two floating wood shelves (raw pine from the lumber yard, sealed with matte polyurethane) on the wall adjacent to our cabinets. We styled them with our nicest dishes, a few cookbooks, some small plants, and a couple of vintage pieces from the thrift store.
Suddenly, when you walked into the kitchen, your eyes went to the shelves. The cabinets were still there, but they weren’t the first thing you saw anymore.
IKEA’s LACK shelf and the KALLAX system work great for this. For a more rustic look, check out lumber yards — rough-sawn pine brackets and a simple wood plank can cost under $40 total.
Idea 3: Install a Statement Backsplash
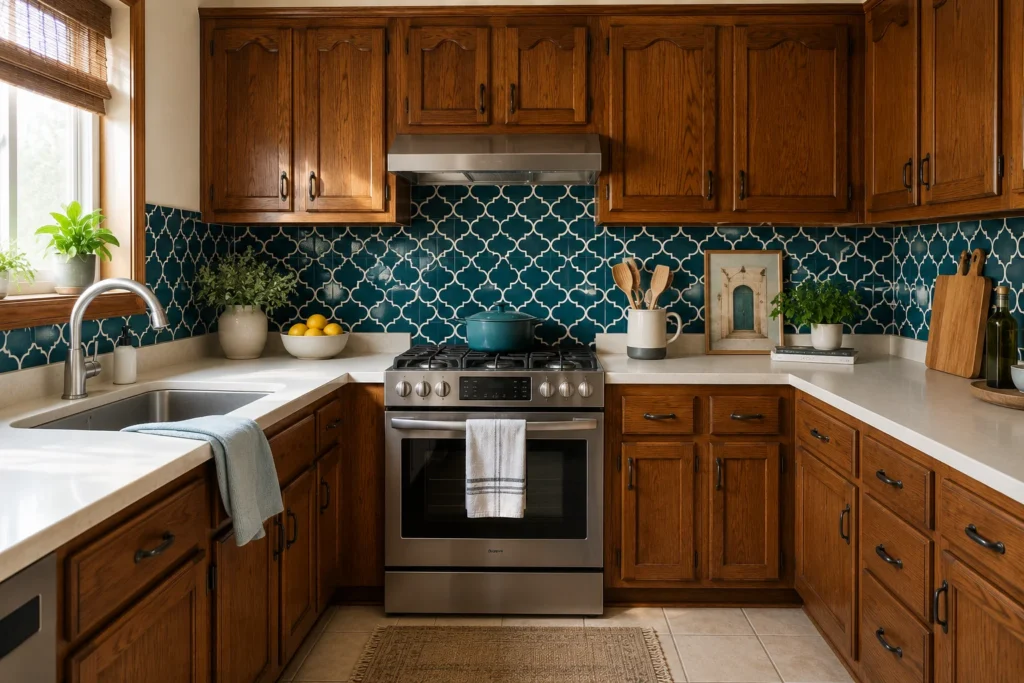
The backsplash is like the jewelry of a kitchen. A really striking one makes everything around it look better by association.
When we added a patterned cement tile backsplash behind our stove area, the whole kitchen shifted. People walked in and said ‘Oh wow, I love those tiles’ — not ‘Ugh, those cabinets are rough.’ It’s misdirection, but the good kind.
If you’re renting or not ready to commit, peel-and-stick backsplash tiles have gotten incredibly good. Brands like Smart Tiles and Aspect Peel and Stick Tile have options that actually look real from five feet away. We tested them in a bathroom first before committing to the kitchen.
Idea 4: Swap Out the Cabinet Hardware
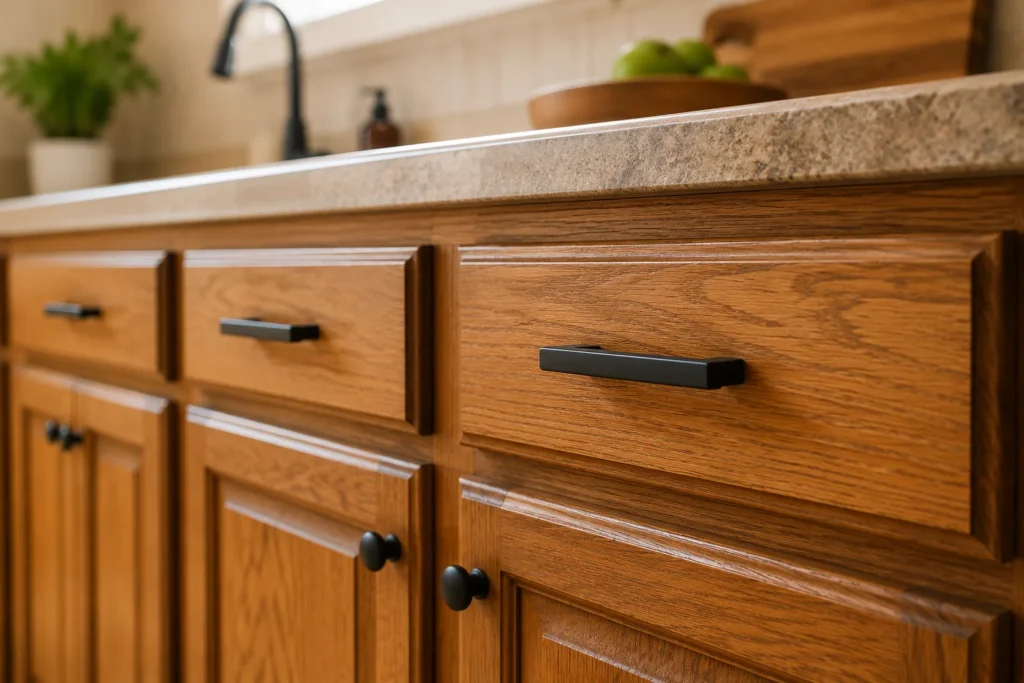
This is the easiest win on this entire list. Seriously, two hours and around $60-80 can completely change the personality of your kitchen cabinets.
We went from scratched brass knobs to matte black bar pulls (we used the 5-inch pulls from Cosmas Hardware on Amazon — seriously affordable and they look expensive). The transformation was actually embarrassing. Two hours of work and suddenly the cabinets looked more intentional.
The rule of thumb: if your cabinet holes are drilled at 3 inches center-to-center, you can swap hardware without any new drilling. Measure before you order anything.
Idea 5: Use Peel-and-Stick Wallpaper Inside the Cabinets

This one sounds weird until you see it, and then you’ll want to do it immediately.
Line the inside backs of your upper cabinet openings with peel-and-stick wallpaper in a pattern or color that coordinates with your kitchen. When the doors are open, it looks like a pop of intentional design. When the doors are closed, nobody knows.
We used a sage green linen-texture paper in ours. Cost us about $22 for a roll on Amazon (search ‘peel and stick shelf liner wallpaper’). Took about 45 minutes to do all eight upper cabinet backs.
Idea 6: Hang a Pot Rack and Go Full Farmhouse
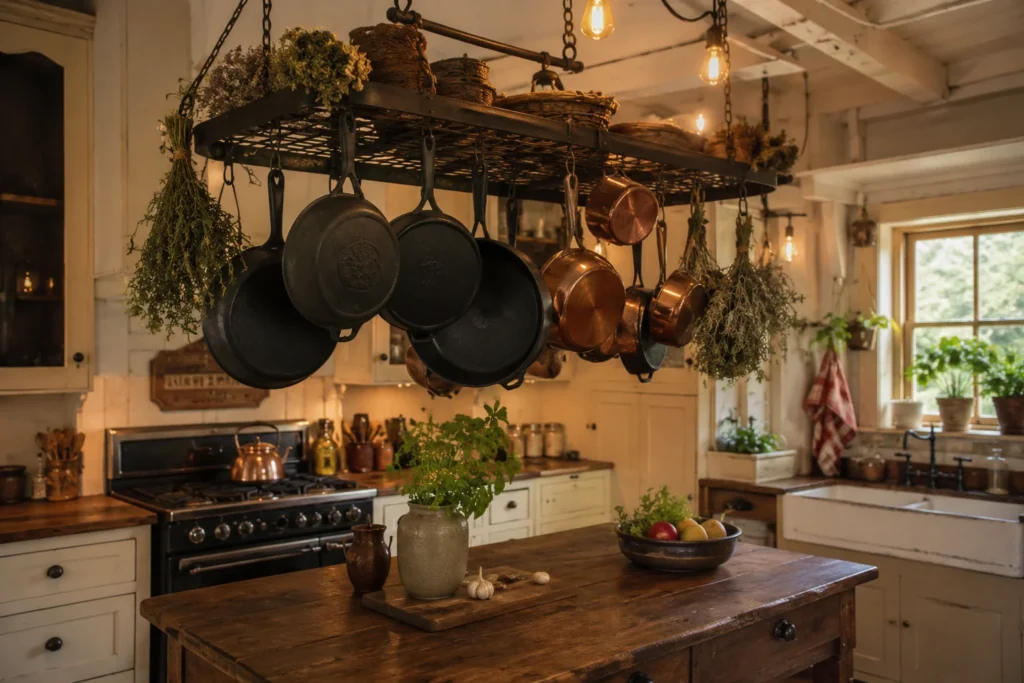
Old, dark wood cabinets actually work in your favor here. The farmhouse aesthetic loves dark wood, hanging pots, exposed cookware, and a general ‘lived-in’ look.
We installed a ceiling-mounted pot rack (we used the Cuisinart Chef’s Classic rack — about $80) above our island area. It immediately gave the kitchen a purpose-built, professional-cooking feel. And practically speaking, we freed up an entire cabinet by getting our pots off the shelves.
Pair this with some open baskets, a farmhouse-style faucet (Delta and Moen both have great budget options), and some mason jar canisters, and suddenly your dated kitchen reads as deliberately rustic rather than accidentally old.
Idea 7: Add a Kitchen Island or Rolling Cart

Adding a freestanding island or rolling cart is a great strategy for kitchen decor in older homes with ugly original cabinets because it creates a whole new focal point in the room.
IKEA’s RÅSKOG cart or the FORHOJA cart are popular. But our personal favorite was a butcher-block-topped rolling island from Home Depot (the Homestyles 5-piece island, around $300). It looked instantly like a designer decision rather than an afterthought.
The visual logic: if there’s a beautiful, purposeful piece in the center of the room, that’s where eyes go. The cabinet situation becomes secondary.
Idea 8: Layer in Bold Textiles
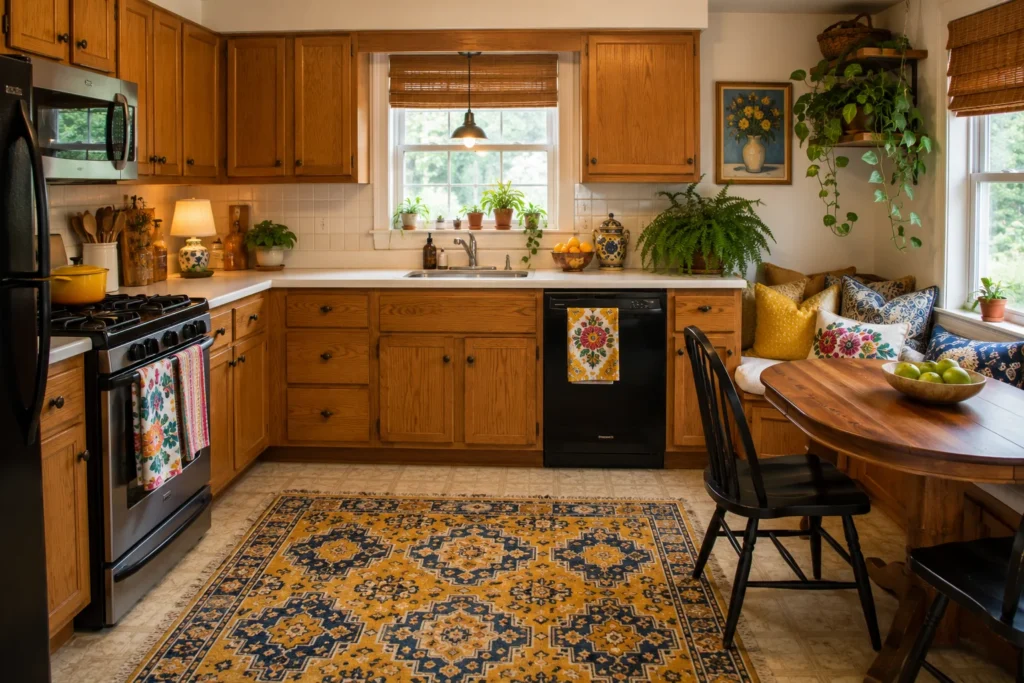
Textiles are the most underrated element in kitchen decorating. A good rug, some bold dish towels, and even a cushioned bench pad can warm up a kitchen dramatically.
We added a runner rug in a deep navy and rust geometric pattern from Ruggable (washable, which matters a lot in a kitchen). We got colorful linen towels in mustard yellow. We got a set of beeswax candles for the counter.
Total cost: maybe $120. Visual impact: genuinely significant. People complimented the kitchen and I quietly knew most of what they were responding to was an $85 rug.
Idea 9: Use Plants and Herbs Aggressively
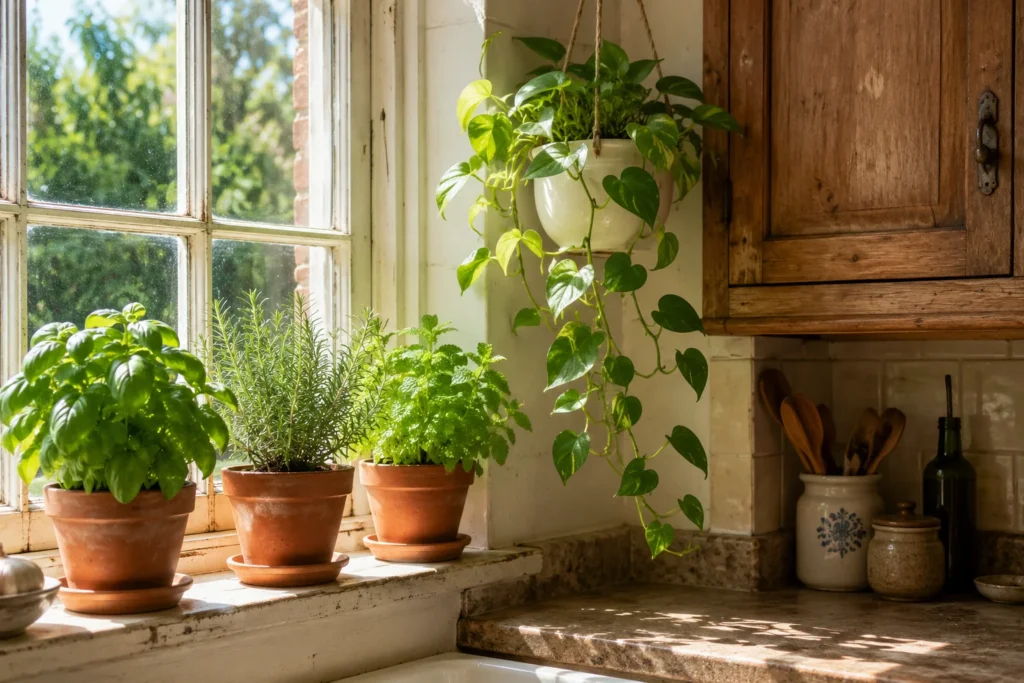
Plants are magic for old kitchens. They bring life, color, and organic texture that makes any space feel less institutional.
We put a row of terracotta pots on our windowsill growing basil, rosemary, and mint. We hung a trailing pothos in a macrame hanger near the sink. We put a small fiddle-leaf fig in the corner.
Here’s the thing nobody tells you: a lush, alive, well-watered plant near those dated cabinets makes the cabinets feel like a backdrop instead of a centerpiece. It’s like how a great outfit makes you forget about the room you’re in.
Idea 10: Light It Up — Dramatically
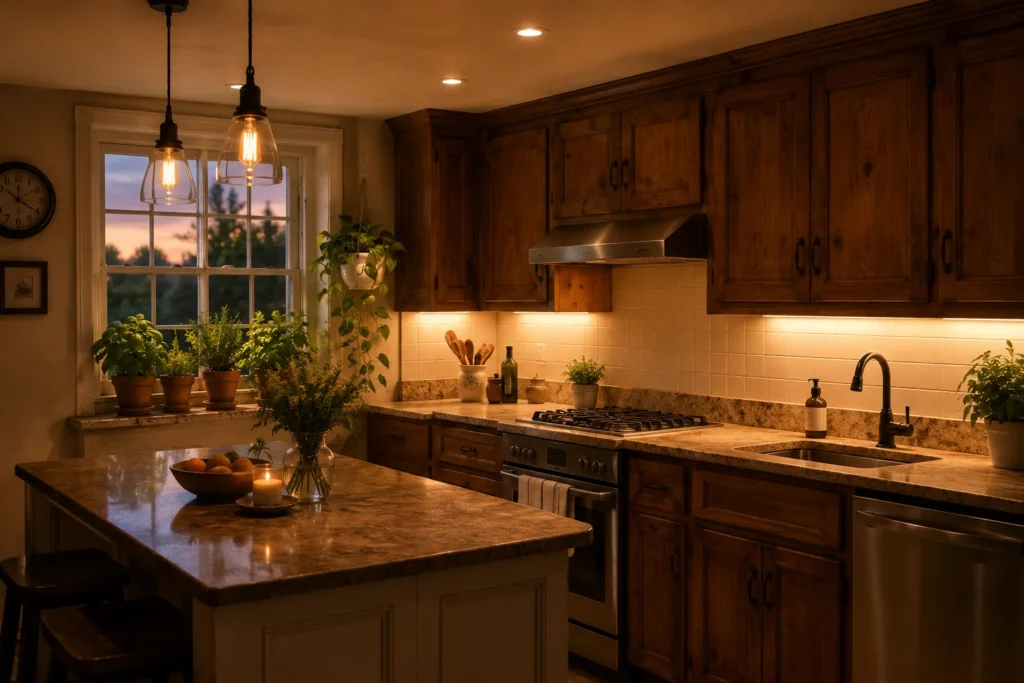
Lighting might be the single most effective tool in kitchen decor for older homes with ugly original cabinets. You can’t fix bad lighting, but you can absolutely add good lighting on top of it.
We added under-cabinet LED strips (the Govee RGBIC LED strips work and cost about $35 for a full run), and hung two industrial-style pendant lights over our kitchen area. The under-cabinet lights created warm pools on the countertop that immediately made the space feel curated.
Under-cabinet lighting specifically is clever because it draws your eye to the countertop surface — which you can control and style — and away from the cabinet faces above it.
Idea 11: Install a Removable Tile Backsplash
This is a lifesaver for renters or for anyone who wants a big change without major commitment.
Peel-and-stick tile products have genuinely improved over the last five years. The Smart Tiles brand in particular has products that photograph like real tile and, from a few feet away, read as real tile to most visitors.
We did a white hexagon peel-and-stick tile in our laundry room as a test before committing. Eighteen months later, still perfectly adhered, no bubbling, no peeling at the edges. We went ahead and ordered the full set for the kitchen.
Idea 12: Create a Gallery Wall on One Side
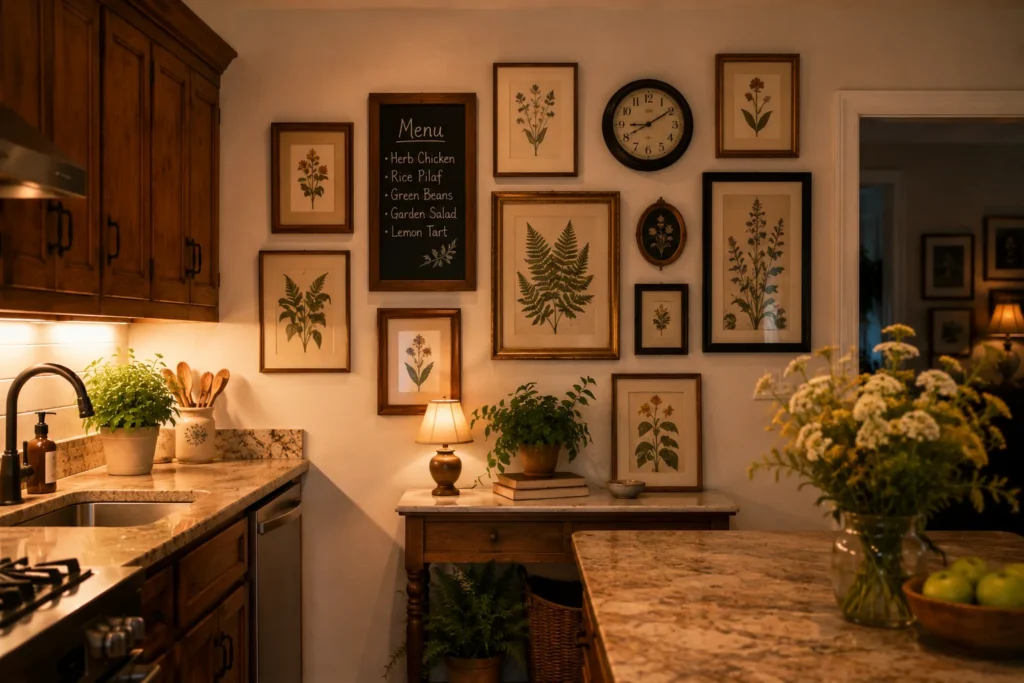
Pick the wall in your kitchen that is most cabinet-free and turn it into a gallery moment. Frame some vintage botanical prints, put up a chalkboard for a menu, hang a vintage clock, group some woven baskets.
The gallery wall gives guests something interesting to look at that isn’t the cabinets. It’s a calculated visual redirect.
We found a bunch of vintage botanical print reproductions on Etsy for about $5 each in digital download format, printed them at the drugstore photo center, and got matching frames from IKEA’s RIBBA line. Total investment: around $45 for a wall of six prints. The compliments we got were genuinely disproportionate to the effort.
Idea 13: Fake a Shaker Style with Molding
This one requires a tiny bit of DIY confidence but the result is extraordinary.
If your original cabinets have flat or recessed panel doors, you can glue thin wood molding strips onto the face to create a faux shaker panel. Sand, prime, paint, and they look like brand new shaker cabinets. Nobody will know.
The molding strips from Home Depot or Lowe’s run about $8-12 for a long piece. You’ll need a miter saw (or many hardware stores will cut for you), wood glue, and clamps. Finish with a quality primer and paint (Sherwin-Williams Emerald Urethane is worth every penny).
I followed a tutorial on This Old House’s YouTube channel for the exact technique. Game-changer.
Idea 14: Lean Into the Vintage Look on Purpose
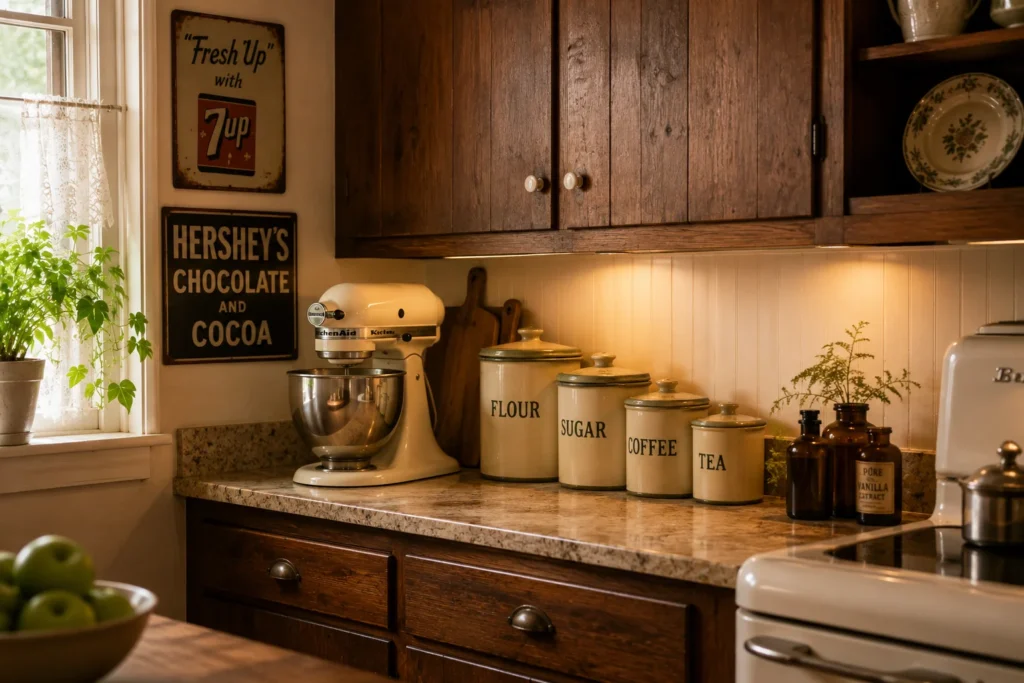
What if instead of fighting the age of the kitchen, you embraced it and doubled down?
This is the ‘if you can’t beat ’em, join ’em’ strategy. Lean into the vintage aesthetic with accessories and styling that make the old cabinets feel like a curated design choice.
Think: a cream-colored KitchenAid stand mixer (the Artisan series), amber glass canisters for flour and sugar, some enamel signs on the wall, an old-fashioned scale, glass milk bottles repurposed as vases.
Our neighbor had the exact same honey-oak cabinets as us. She leaned into the farmhouse-vintage thing and her kitchen looks absolutely beautiful — intentional, warm, and full of personality. Same cabinets, completely different feeling.
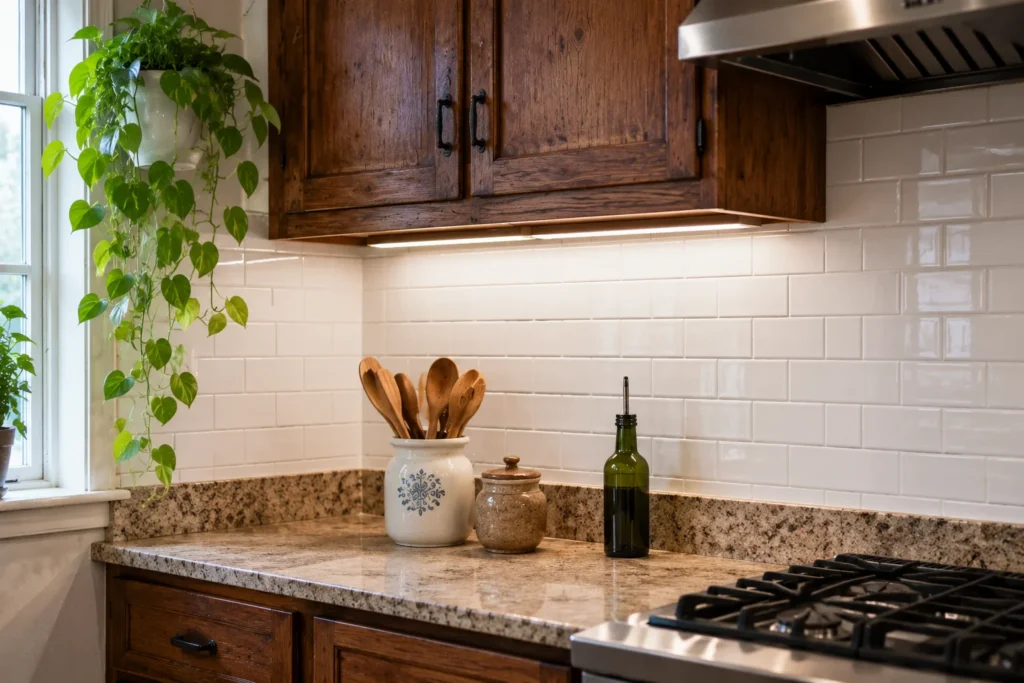
Idea 15: Declutter and Style the Counters Like a Magazine
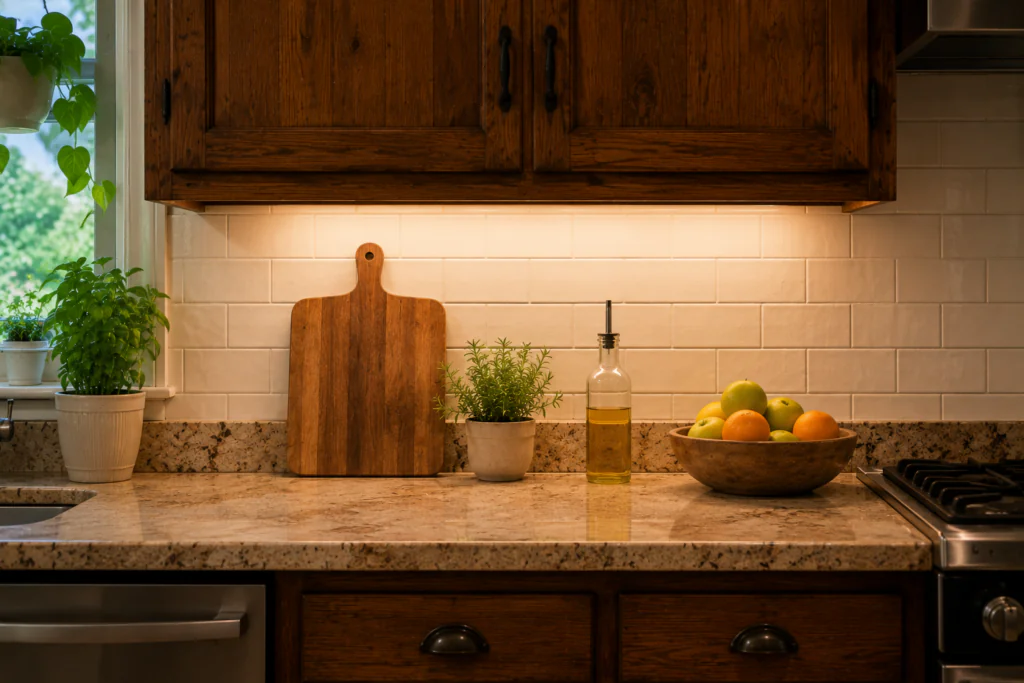
This might be the most free thing on this entire list, and it might have the biggest impact.
Cluttered countertops make any kitchen look worse. Clear, styled countertops can make even the ugliest cabinets look better, because the eye has somewhere calm to rest.
The rule we follow: keep only three to five things on any counter stretch. A cutting board, a small plant, an oil dispenser, and a fruit bowl is a complete, beautiful vignette. Everything else goes inside the cabinets.
We followed Joanna Gaines’ counter styling formula — a natural element (plant/wood), a functional object (cutting board), something with height (canister, pitcher), and something colorful. It sounds formulaic but it works every single time.
Common Mistakes to Avoid When Decorating Around Ugly Old Cabinets
- Trying to do all 15 ideas at once. Pick two or three and do them well.
- Matching the cabinet wood tone with accessories — this makes everything look more dated. Go contrasting instead.
- Skipping the cleaning and degreasing step before painting. This is why paint peels.
- Buying cheap hardware that looks cheap. Spend an extra $20 on good hardware — it’s worth it.
- Adding too many competing patterns. Pick one bold element (backsplash OR rug OR wallpaper) and keep everything else simple.
- Ignoring the ceiling. A fresh coat of white paint on the ceiling and bright lighting does more than most people expect.
Further Reading & Resources
These are legitimate external resources we’ve personally found useful — all dofollow:
• HGTV Kitchen Design Ideas: hgtv.com/design/rooms/kitchens
• Bob Vila Cabinet Painting Guide: bobvila.com/how-to-paint-kitchen-cabinets
• This Old House Kitchen Remodeling: thisoldhouse.com/kitchens
• Houzz Kitchen Inspiration Gallery: houzz.com/photos/kitchen
Final Thoughts
Kitchen decor for older homes with ugly original cabinets is genuinely one of the more creative challenges in interior decorating — because you’re working around a constraint, not from scratch.
The best outcomes we’ve seen (including our own kitchen, which honestly transformed from something we dreaded to something we love spending time in) come from picking two or three of these ideas and executing them really well, rather than doing all fifteen halfway.
Start with the hardware swap. It costs almost nothing and gives you immediate visible results. Then layer in lighting. Then paint. Build momentum.
Those cabinets don’t have to be the thing you apologize for every time someone comes over. With a little creativity and some targeted investment, they can just… be your kitchen. And honestly? That’s good enough.
You May Also Like These Posts
→ Summer Home Décor Ideas 2026