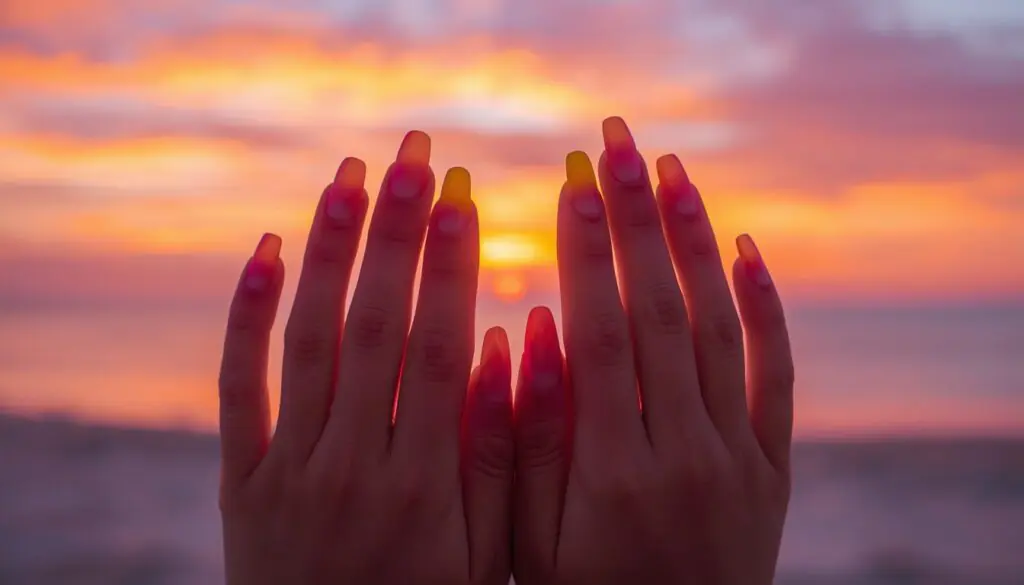
Why Beach Vacation Nails Are a Total Game-Changer
Last summer, I showed up to Bali with what I thought were the perfect nails — a fresh gel manicure I’d paid good money for just 48 hours before my flight. Three days in, they looked like I’d been digging up the beach with my bare hands. The topcoat had turned chalky, two nails had chipped completely, and the rest were peeling at the edges. My pedicure? Don’t even ask.
The worst part? Every photo I took by the pool had those busted nails front and center.
That trip was my wake-up call. I went down a rabbit hole researching beach vacation nails — what works, what doesn’t, which formulas actually hold up against saltwater, sunscreen, and three hours of building sandcastles. And what I found completely changed how I prep my nails before any beach trip now.
If you’ve ever come back from vacation with nails you’re embarrassed to show in photos, this guide is for you. Let’s talk about beach vacation nails the right way — the colors, the designs, the prep, and most importantly, how to make them actually last.
2. The Big Mistake Everyone Makes (And How I Learned the Hard Way)
Here’s the thing nobody tells you: regular nail polish and beach vacations are enemies.
I used to think I’d just grab a fresh bottle of OPI coral from my drawer, slap on two coats the night before my trip, and call it done. And every single time, by day two, I was at the hotel gift shop buying nail polish remover and starting over.
The combination that destroys regular polish at the beach:
- Saltwater — it causes the polish to swell, soften, and lift from the nail bed
- Sunscreen — particularly oily formulas create a barrier that breaks down the bond between polish and nail
- Sand — acts like natural sandpaper against the topcoat
- Heat — makes polish expand and contract, leading to bubbling and cracking
- Chlorine (pool water) — strips the color and fades the topcoat faster than anything
The fix isn’t complicated, but it does require doing things differently. And once I switched my approach, my beach vacation nails started lasting the entire trip — sometimes even longer.
| 💡 QUICK TIP If you’re doing your nails at home before a beach trip, apply your topcoat in thin layers and let each layer cure for at least 2 minutes before adding the next. Rushing this is the #1 reason nails fail in humidity. |
3. Choosing the Right Formula for Beach Vacation Nails
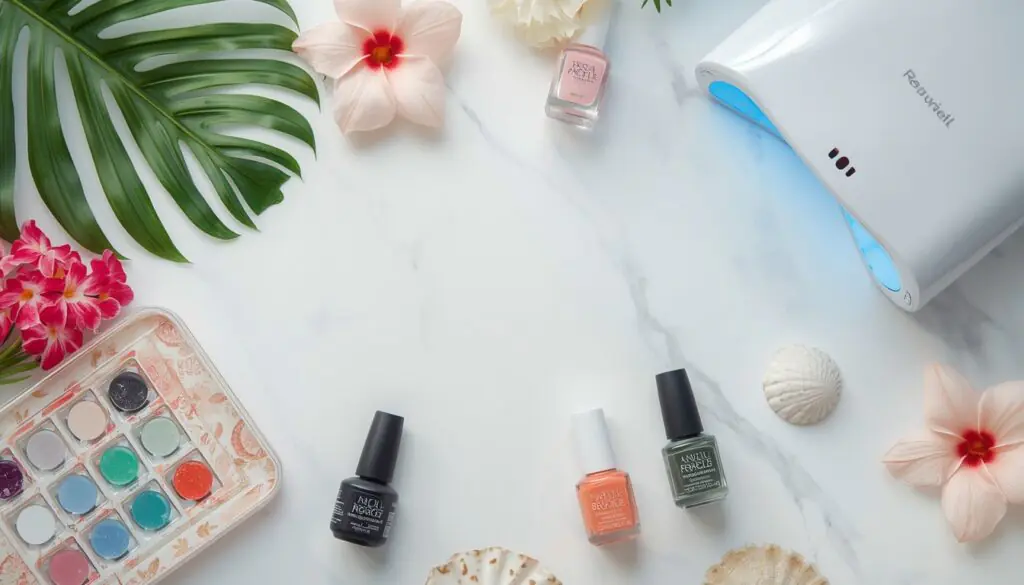
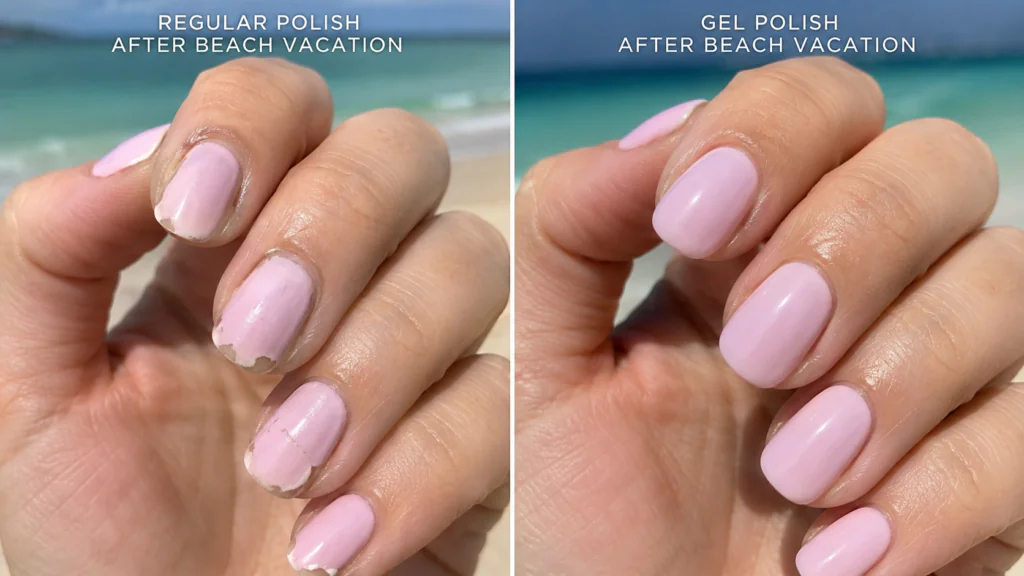
Gel Polish: The Gold Standard for Beach Nails
After years of trial and error, gel polish is my go-to for beach vacation nails. When it’s properly cured under a UV/LED lamp, it forms a hard shell over the nail that resists water, heat, and general beach chaos.
The brands I’ve actually tested and trust for beach trips include OPI GelColor, Gelish, and Kiara Sky. These have consistently lasted 2-3 weeks on my nails even through a full beach vacation.
The catch: you either need to go to a salon for application or invest in a home gel kit. I use the Beetles Gel Polish Kit ($40-ish on Amazon) for touch-ups between salon visits.
Dip Powder: The Underrated Option
Dip powder nails are genuinely underrated for beach trips. They’re thicker than gel, incredibly chip-resistant, and don’t need UV light to set. SNS and Kiara Sky Dip systems are popular at salons.
The downside? Removal is a commitment — you need to soak them off in acetone, which can feel like a whole project when you get back home.
Press-On Nails: The Underdog Hero
Okay, I know what you’re thinking. But hear me out — press-on nails have come a long way. Brands like imPRESS by Kiss, Static Nails, and Glamnetic now offer salon-quality press-ons that can genuinely last a week with proper prep.
I used Static Nails press-ons on a 10-day Maldives trip last year as my backup set and they lasted 8 full days, including kayaking and snorkeling. The key is prepping with nail glue (not the sticker tabs they come with) and making sure nails are completely oil-free before application.
Regular Polish: Use It Right or Not at All
If you’re committed to regular polish for your beach vacation nails, at least use a rubber-base coat (Orly Bonder is excellent) and a proper topcoat like Seche Vite or HK Girl. These two products alone can extend wear by 4-5 extra days.
But honestly? Save regular polish for the fancy dinner nights when you’re not in the water.
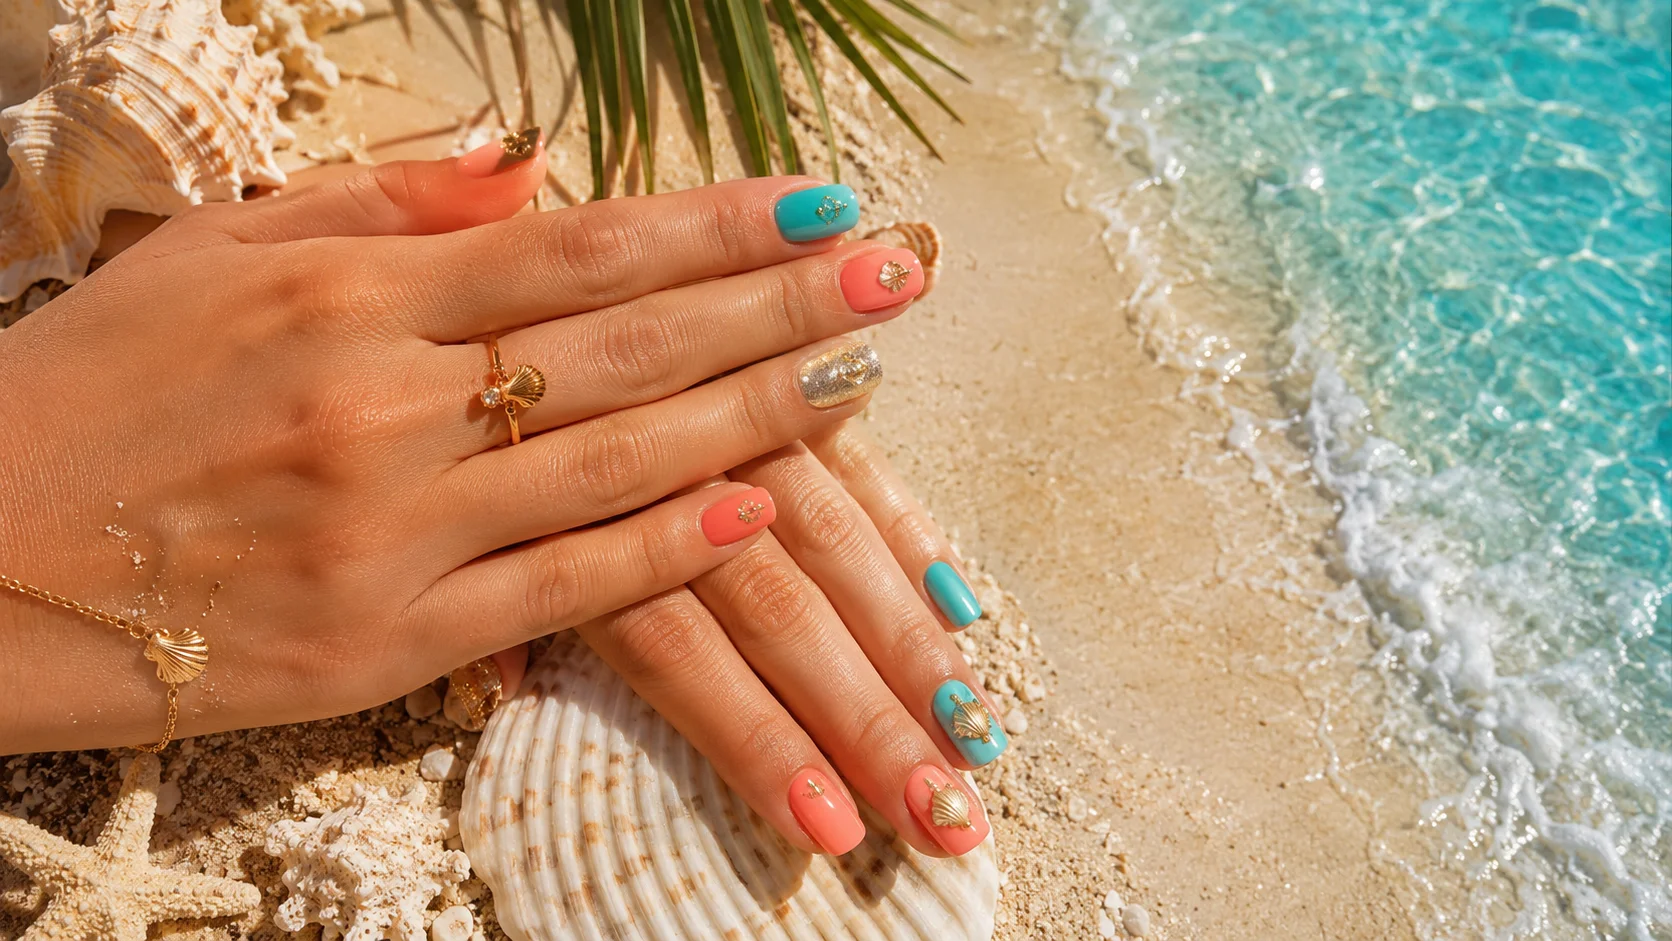
4. 10 Gorgeous Beach Vacation Nail Ideas for 2026
Idea #1: Classic Coral Beach Vacation Nails
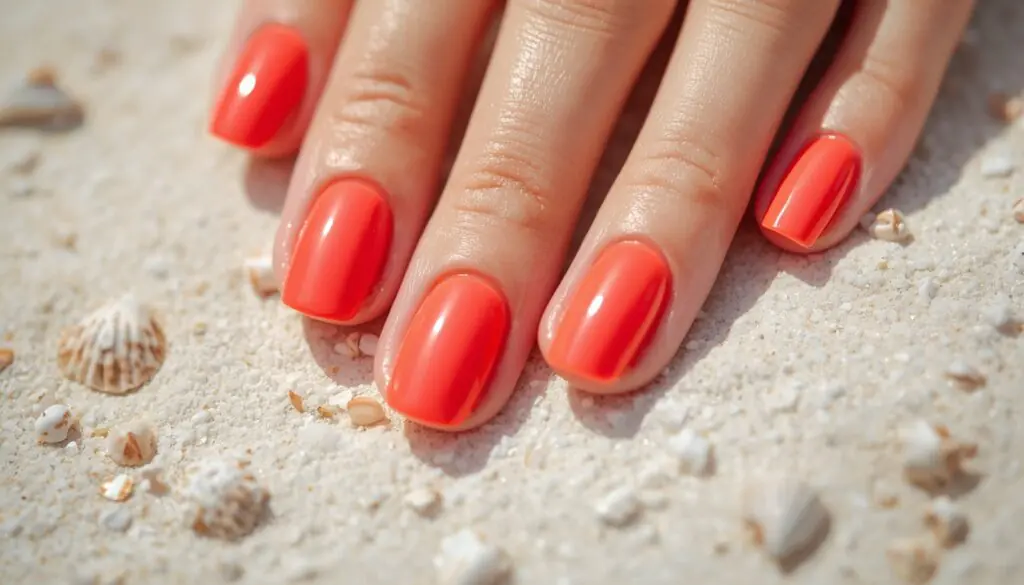
Coral is THE classic beach color. It flatters every skin tone, photographs beautifully in natural light, and screams vacation. My personal favorite coral for beach vacation nails is OPI’s ‘Toucan Do It If You Try’ — it’s been in my kit for three years running.
For the finish, go glossy rather than matte at the beach. Matte topcoats look gorgeous but they absorb sunscreen and start looking rough within a day or two of beach exposure.
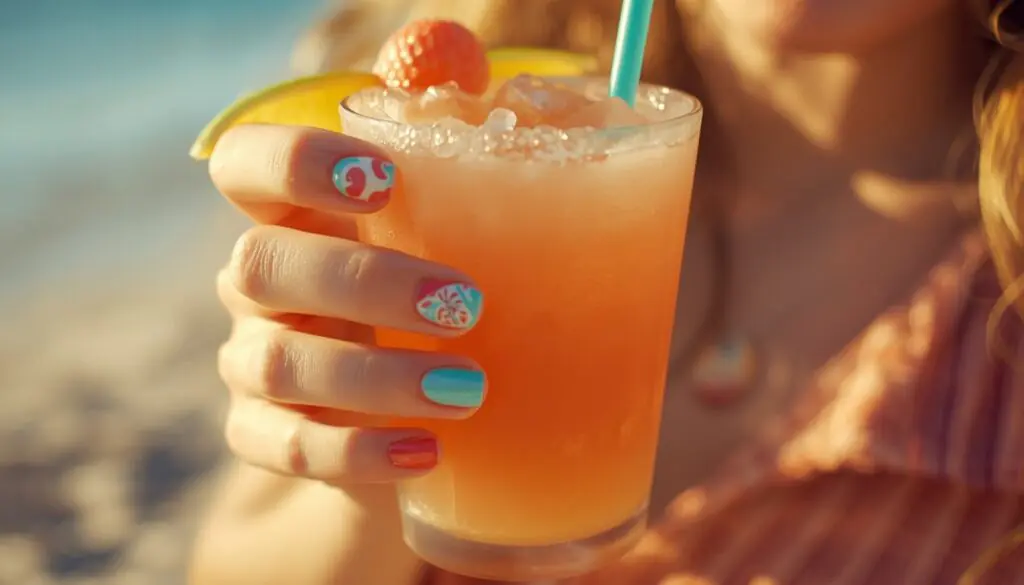
Idea #2: Ocean Blue Ombré
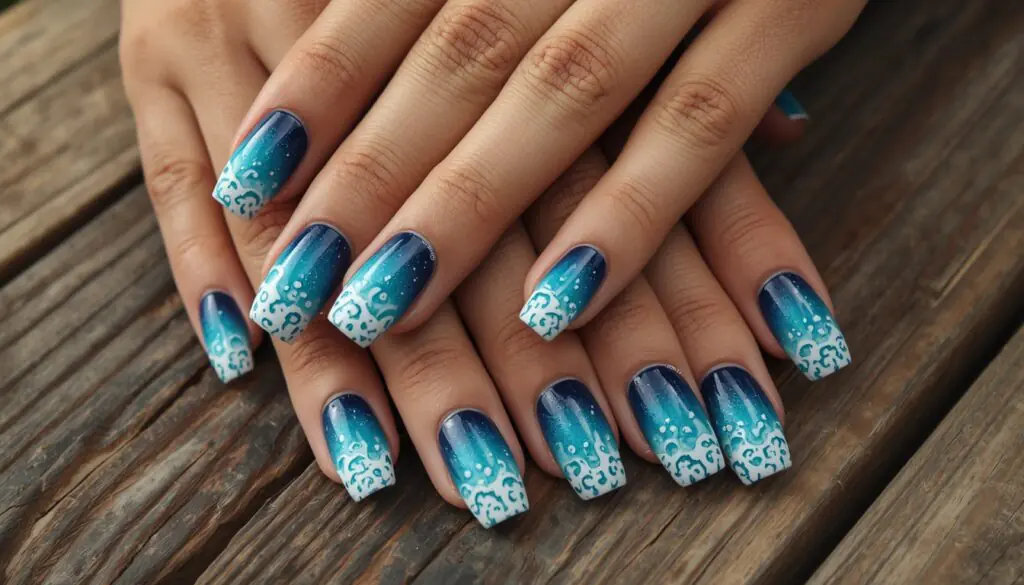
The ocean ombré is one of those beach vacation nail designs that people will stop you to ask about. You start with a deep navy or midnight blue at the base and blend into aqua or turquoise toward the tip. Add white foam streaks with a fine nail art brush and you’ve got literal waves on your nails.
This works best with gel polish because the ombré effect is easier to blend before it’s cured, and it stays sharp for weeks.
Idea #3: Shell and Pearl Nail Art
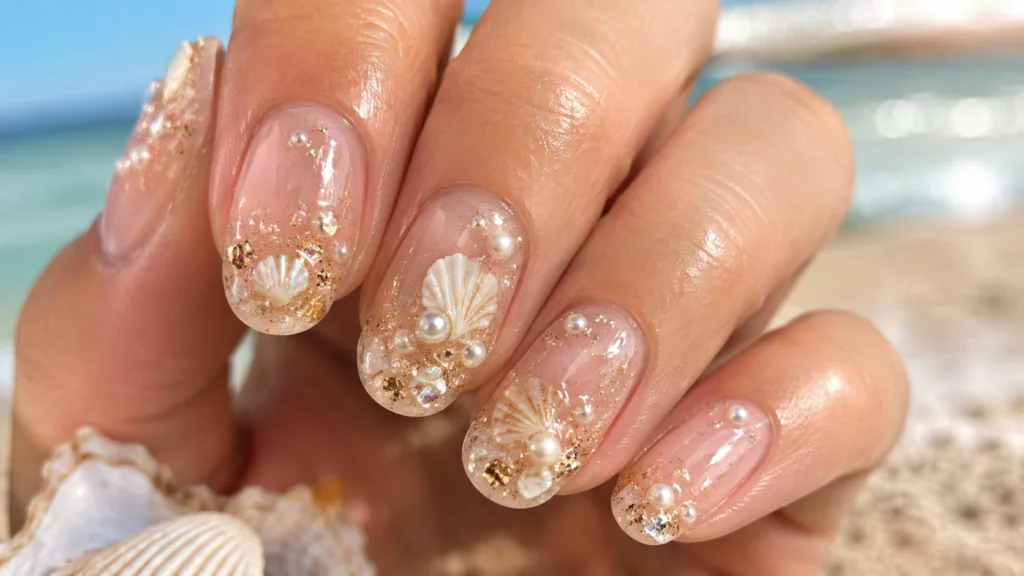
This one takes a bit more skill but the payoff is incredible. You apply a sheer pink or nude base and then use a nail art brush to paint tiny shells, or you can actually embed micro seashell fragments (yes, they sell these at beauty supply stores) into the wet topcoat before curing.
Adding pearl nail gems from brands like Makartt gives a resort spa kind of vibe that’s perfect for beach vacation nails. Just make sure to seal them with a thick gel topcoat so they don’t catch on anything.
Idea #4: Sandy Nude with Gold Foil
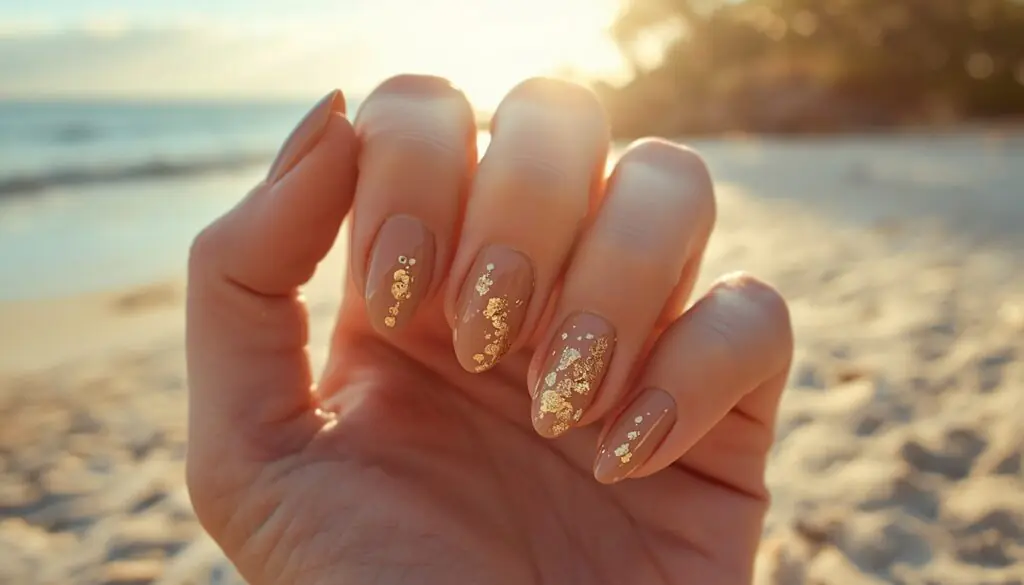
If you want something that looks polished and pulled together without screaming ‘I tried too hard,’ this is it. A sandy, warm nude base with gold foil flakes pressed in randomly looks like something out of a high-end resort brochure.
The great thing about nude beach vacation nails is that they’re incredibly versatile — they work for the beach, dinner, boat trips, everything. And the gold foil adds just enough interest that it photographs beautifully.
Idea #5: Tropical Sunset Ombré
Yellow to orange to pink to purple. That’s it. That’s the whole design and it’s absolutely stunning. This is the one I did for my Thailand trip and every single photo with my hands in it looked like an editorial shoot.
The key to getting the gradient right is using a makeup sponge. Apply each color in overlapping bands on the sponge, then dab it onto the nail while the colors are still slightly wet. It blends better than any brush technique I’ve tried.
Idea #6: Aqua French Tips (Coastal French Manicure)
Take the classic French manicure and swap the white tips for a bright turquoise or aqua. It’s fresh, modern, and feels more beach-appropriate than traditional French tips. This coastal French manicure style has been blowing up on Pinterest and Instagram throughout 2026 and I can see why — it’s timeless but updated.
Try Essie’s ‘Turquoise & Caicos’ for the tips. It’s a perfect tropical aqua that looks incredible against every skin tone I’ve seen it on.
Idea #7: Starfish & Seahorse Nail Art
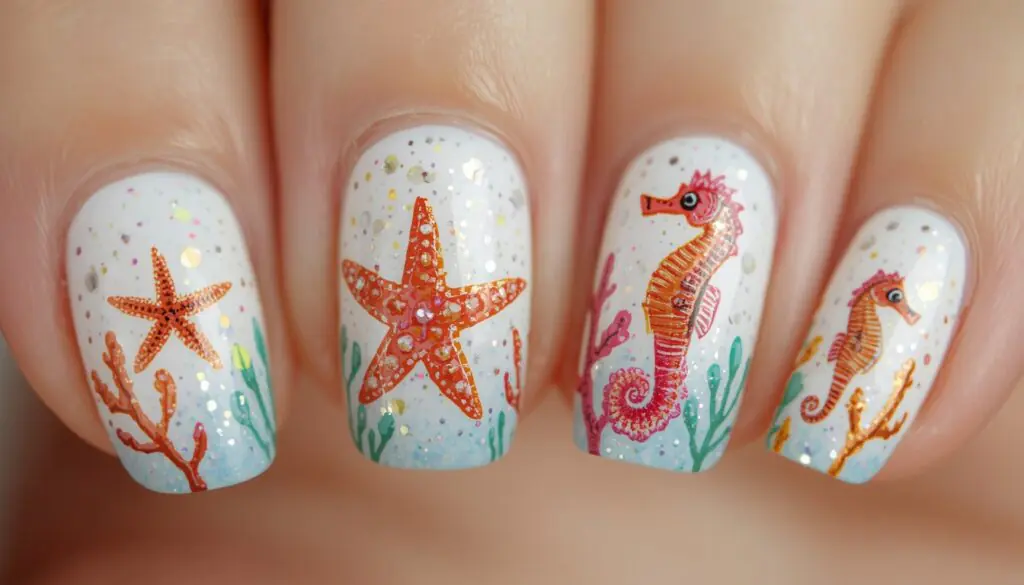
This one is for the nail art lovers who don’t mind spending the extra time (or booking with a nail tech who specializes in art). Tiny hand-painted starfish, seahorses, and coral designs on a white or pale blue base look like you commissioned a miniature ocean painting.
If you’re doing this at home, nail art stamping kits are a game-changer. Moyou London makes gorgeous ocean-themed stamp plates and all you need is stamping polish and a stamper tool. The whole thing takes maybe 20 minutes once you get the hang of it.
Idea #8: Watercolor Wash Nails
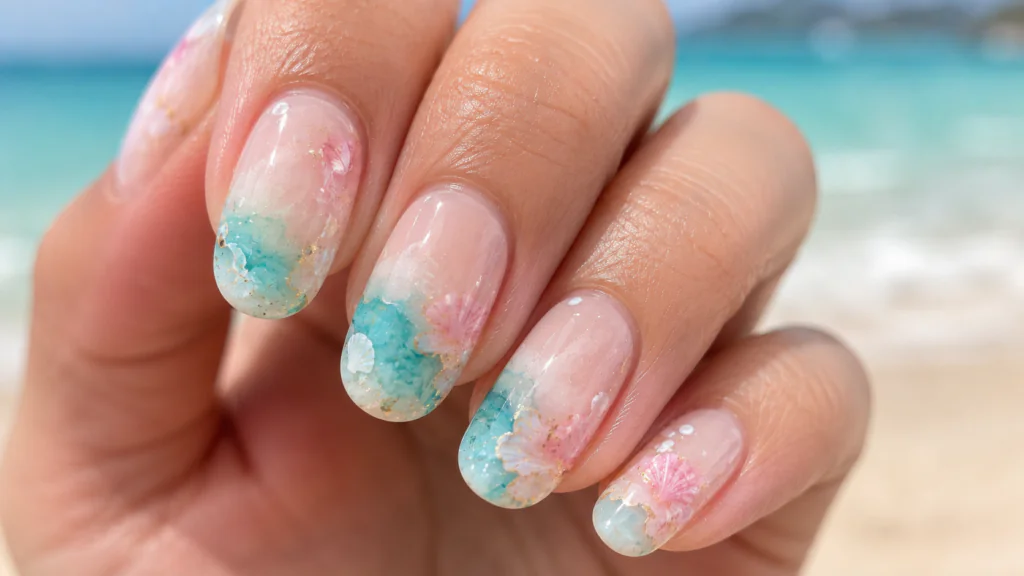
Watercolor nails are having a major moment right now and they’re perfect for beach vacation nails because they look like the ocean itself. You use thin, watered-down gel polish (or use the sheer versions that many brands sell) and layer translucent washes of blue, pink, and white.
This design is surprisingly forgiving — there’s no wrong way to layer watercolor nails because the whole aesthetic is organic and painterly. Great option if you’re a nail art beginner.
Idea #9: Mermaid Chrome Nails
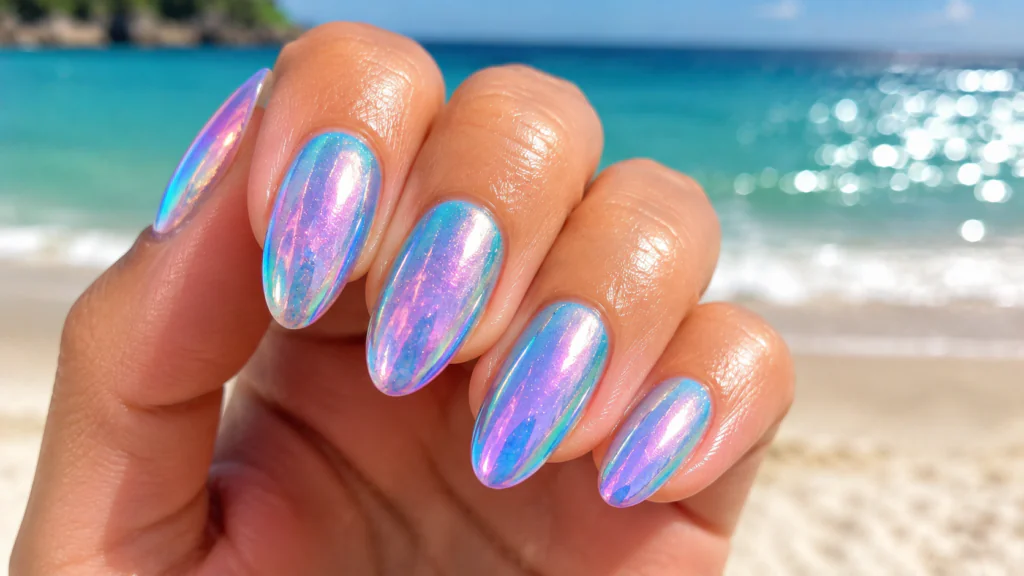
If there’s one beach vacation nail trend I want everyone to try, it’s this one. Mermaid chrome nails use holographic chrome powder applied over a gel base to create a shifting, iridescent effect that looks different in every light. In direct beach sunlight, they’re absolutely breathtaking.
You can get the chrome powder on Amazon for $8-12. Apply it over a dark teal or deep purple cured gel base, rub on with a silicone applicator, and seal with no-wipe topcoat. The whole process adds about 10 minutes to your nail appointment.
Idea #10: Minimalist Seaglass Nails

Not everyone wants bold or elaborate nails on vacation, and that’s completely valid. Seaglass nails — those milky, washed-out, pale seafoam and sage greens — are the perfect minimal beach vacation nail option. They’re understated, elegant, and somehow always photograph like they belong on a travel blog.
Zoya makes some of my favorite seaglass tones: ‘Rocky’ and ‘Bay’ are both gorgeous for this look. These shades also tend to be more forgiving of minor chips because the color is so soft.
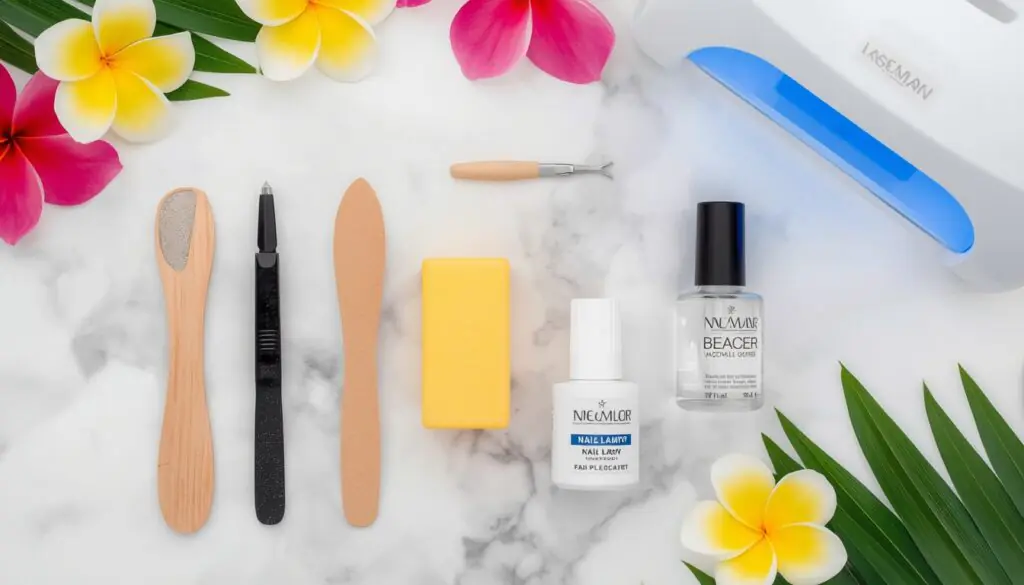
5. Step-by-Step: How to Prep Your Nails Before a Beach Trip
This is the part most people skip, and it’s exactly why their beach vacation nails fail. Prep is everything.
- File and shape your nails at least 24-48 hours before application. Fresh filing can cause micro-tears in the nail that affect adhesion.
- Push back your cuticles gently with a rubber cuticle pusher. Never cut them — this creates openings for bacteria at the beach.
- Buff the surface of each nail lightly to create texture. This gives the base coat something to grip.
- Apply a nail dehydrator (I use Mia Secret Nail Prep Dehydrator) and let it dry completely. This removes all oils and moisture from the nail surface. This step alone can add an extra week to your wear time.
- Apply a rubber base coat, NOT a regular base coat. Rubber base coats are flexible and bond to the nail more aggressively. Makartt and Beetles both make excellent rubber base coats under $15.
- Apply your color in thin, even coats. Thin coats = better adhesion. Thick coats = bubbling and peeling.
- Cap the free edge (the tip of your nail) with every single coat, including the topcoat. This seals the edge and is the single most effective technique for preventing beach chipping.
- Apply topcoat, cap the free edge, and cure for the full recommended time. Don’t cut the cure time short.
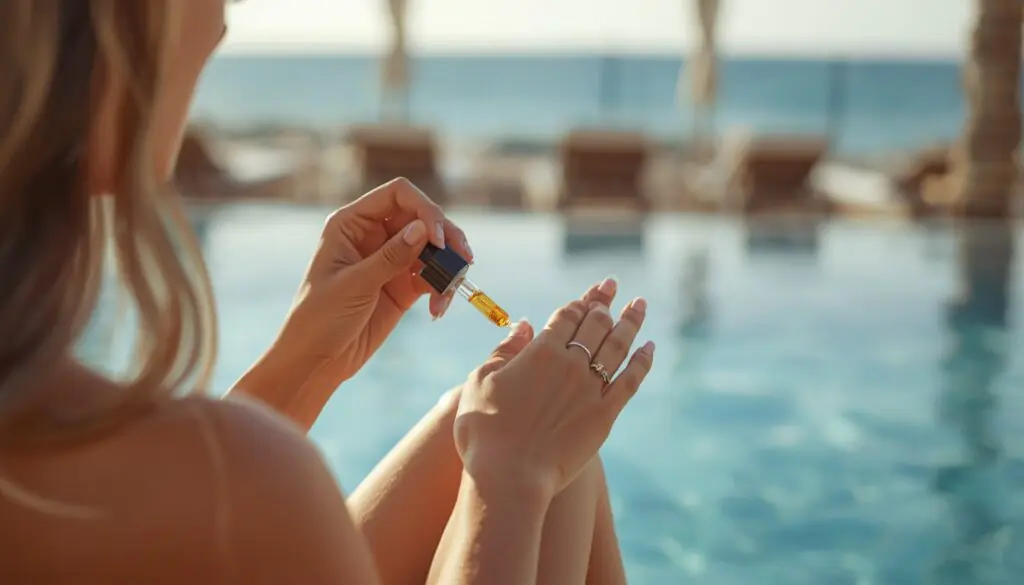
- Finish with cuticle oil on your skin only — keep it off the nail surface for the first 24 hours.
| ⚠️ IMPORTANT Wait at least 24 hours after getting your gel nails done before going in the ocean or pool. Even cured gel needs time to fully harden and bond. This one change extended my beach nail life from 5 days to 14 days. |
6. The Best Beach Nail Colors of 2026
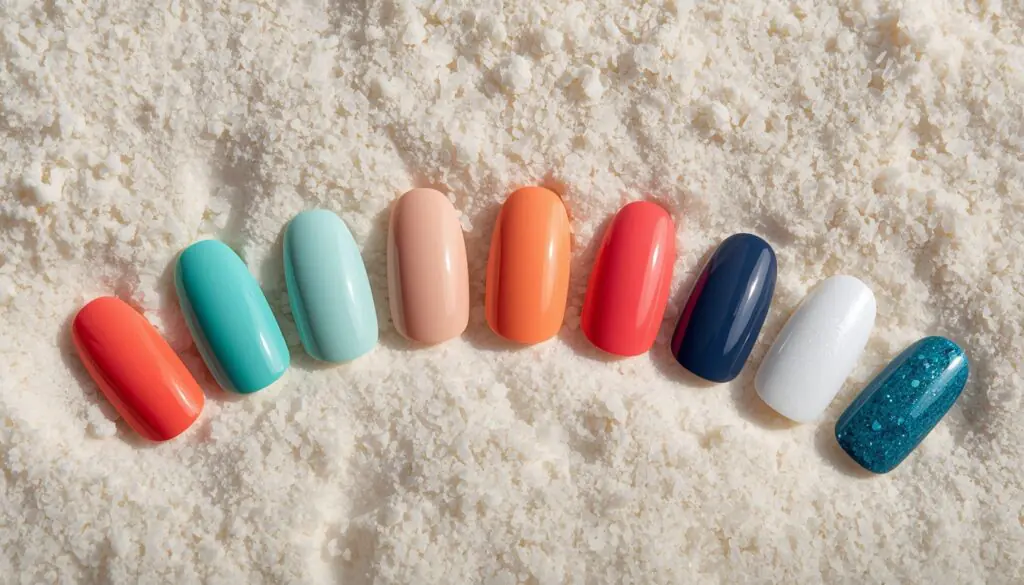
Every year brings new shades that feel right for the beach, and 2026 is no different. Here’s what’s trending this season:
🌊 Ocean Tones
- Aqua Splash — that bright, clear turquoise of shallow tropical water
- Deep Dive — inky navy with a subtle shimmer finish
- Seafoam Dream — translucent pale green, the classic seaglass shade
🌅 Sunset Tones
- Mango Tango — warm, ripe orange with a tiny golden shimmer
- Hibiscus Pink — saturated hot pink, bold and confident
- Papaya Pulse — peach-orange hybrid, incredibly flattering on tanned skin
🏖️ Neutral Beach Tones
- Driftwood — warm, slightly pink beige, the ultimate ‘your nails but better’
- Sea Salt — cool, whitened pale pink like the foam on a wave
- Desert Sand — warm peachy nude that photographs like a dream
✨ Statement Tones
- Coral Crush — the classic, can’t-go-wrong beach vacation signature
- Mermaid Chrome — that iridescent shifting teal/purple mentioned above
- Sunset Gold — a deep amber-gold that looks incredible against sun-kissed skin
7. Nail Art Designs That Actually Work at the Beach
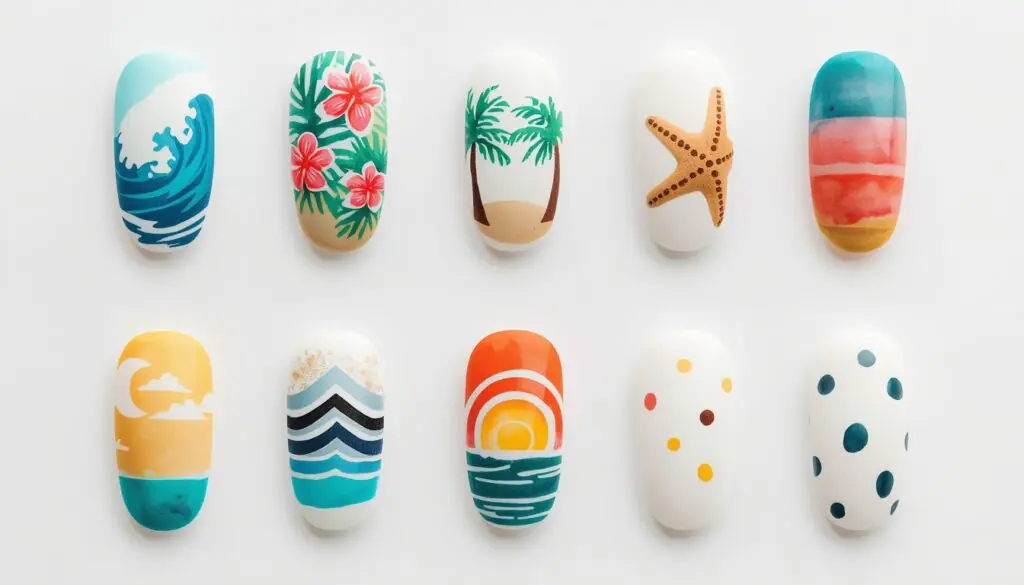
Not all nail art is created equal when it comes to beach survival. 3D elements and chunky embellishments tend to catch on towels and wetsuits, so here’s what actually works:
Designs That Hold Up Well at the Beach:
- Simple stamped patterns — palm trees, waves, dots, geometric lines
- Painted designs sealed under gel topcoat — fully protected
- Color-blocked nails — one block of color per nail, no details to chip
- Negative space designs — minimal, modern, and requires less maintenance
- Chrome or foil finishes — applied under topcoat so completely sealed
Designs to Avoid at the Beach:
- Heavy 3D gems and rhinestones — these catch on everything and fall off
- Chunky nail charms — beautiful for photos, impractical in the water
- Raised gel art (anything textured) — sand scratches these down fast
- Matte topcoat on all nails — absorbs sunscreen and dulls within 24 hours
8. Pro Tips to Make Your Beach Vacation Nails Last 2 Weeks
Beyond the initial prep and application, here’s what I do during the actual vacation to keep my beach vacation nails looking fresh:
Daily Maintenance Routine
- Apply cuticle oil every single night before bed — I use Burt’s Bees Lemon Butter Cuticle Cream, which travels well and smells amazing
- Pat your hands dry after swimming rather than rubbing — rubbing creates friction that lifts the edges of the polish
- Apply sunscreen before your manicure dries or sets each morning — getting sunscreen under your nails is worse than on top of them
- Bring a small bottle of nail glue for emergency repairs — if a corner starts to lift, glue it down immediately before it catches and tears
When at the Pool or Ocean
- Limit fingers-in-water time when you can — nails are more vulnerable when soft
- Avoid opening cans, bottles, or hard containers with your nails — use a coin or a key
- Put sunscreen on before getting in the water so it has time to absorb and won’t sit on your nail surface
The Topcoat Refresh Trick
Every 4-5 days, apply a fresh coat of gel topcoat if you have a travel UV lamp (the Sunuv Gen SUN mini is tiny and perfect for travel), or a regular topcoat if you don’t. This refreshes the shine and seals any minor micro-chips before they become full breaks.
| ✈️ TRAVEL PACKING LIST FOR BEACH VACATION NAILS Bring: Mini bottle of nail glue | Cuticle oil | File/buffer block | Matching gel or regular polish for touch-ups | Mini topcoat | Nail remover wipes (for emergencies) | Travel UV lamp (optional but worth it) |
9. Common Beach Vacation Nail Mistakes to Avoid
I’ve made most of these mistakes myself, so let me save you the heartbreak:
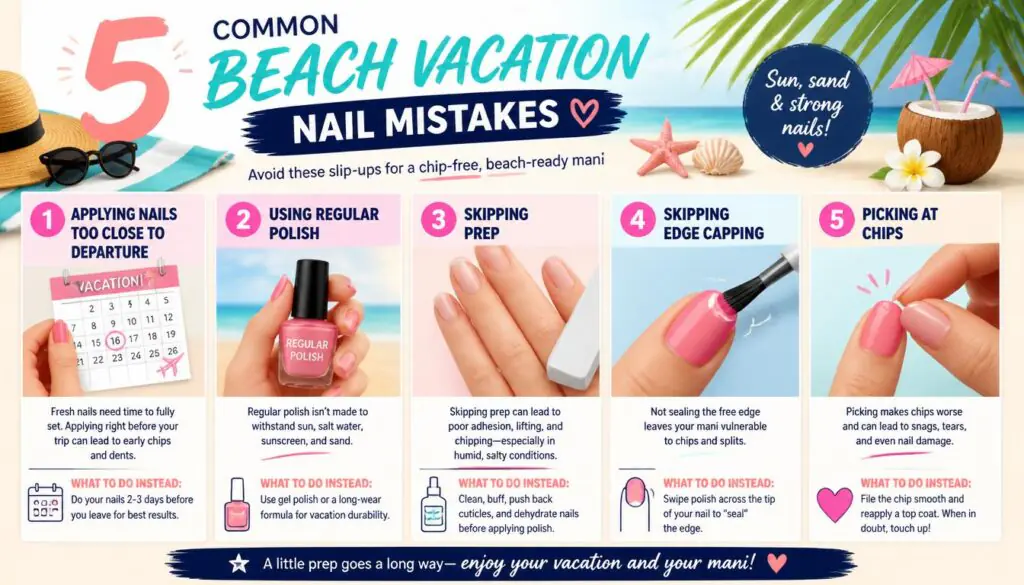
Mistake #1: Getting Your Nails Done the Day Before You Leave
Gel needs a full 24-hour buffer before serious water exposure. Always schedule your nail appointment 2-3 days before your flight. This gives the gel time to fully cure and bond, and gives you time to spot any lifting and fix it before you’re on a plane.
Mistake #2: Skipping the Dehydrator Step
I know it feels like an unnecessary extra step, but nail dehydrator is genuinely one of the most important products for long-lasting beach vacation nails. Oily nail beds are enemy #1 for adhesion.
Mistake #3: Using Thick Coats
Thicker is not better with nail polish. Thick coats take longer to dry, are more prone to bubbling, and peel much faster than thin, even coats. Three thin coats beats two thick ones every time.
Mistake #4: Picking at Chips
I know it’s tempting. But picking at a chip takes the top layer of your actual nail with it, leaving a weak spot. Use a file to smooth the edge instead and do an emergency topcoat repair.
Mistake #5: Ignoring Your Cuticles
Dry, overgrown cuticles make even a fresh manicure look messy within a day. Beach conditions dry your hands out faster than normal, so the cuticle oil routine is non-negotiable if you want your beach vacation nails to photograph well.
Mistake #6: Choosing Gel When You Have Plans to Dive
If you’re planning serious water activities — SCUBA, surfing, multiple days of snorkeling — consider dip powder nails instead. Gel can become slightly flexible with prolonged water exposure; dip powder stays rigid and is actually the more durable option for extreme water sports.
10. Final Thoughts
Beach vacation nails aren’t just about looking cute in photos (though that’s definitely a bonus). For me, having nails I feel confident in while I’m on vacation genuinely adds to the experience. There’s something about that small detail being sorted that lets you relax and enjoy everything else.
The biggest shift for me was realizing that longevity comes from prep, not just the polish itself. You can spend $80 at the fanciest salon, but if you skip the dehydrator and don’t cap the free edge, your nails will still look rough by day three.
Whether you go for a bold sunset ombré, a classic coral, or the mermaid chrome that’ll make everyone at the pool do a double-take, the most important thing is that your beach vacation nails work for you and the activities you have planned.
Bookmark this guide, share it with whoever you’re traveling with, and for the love of all things beachy — give yourself at least 48 hours between your nail appointment and that first ocean dip. Your future vacation photos will thank you.
You May Also Like These Posts
- Wedding Nail Ideas
- 15+ Stunning Easter Nail Ideas for 2026
- Trendy & Cute Vacation Nail Ideas 2026
- Cat Eye Nails Ideas
- Tropical Nail Ideas 2026