1. The Morning I Found Black Spots Behind My Shower Caddy

I moved into my current flat about two years ago and spent the first few weeks just feeling lucky. Big bathroom, good water pressure, south-facing window. Then I moved the shower caddy to clean behind it one Saturday morning.
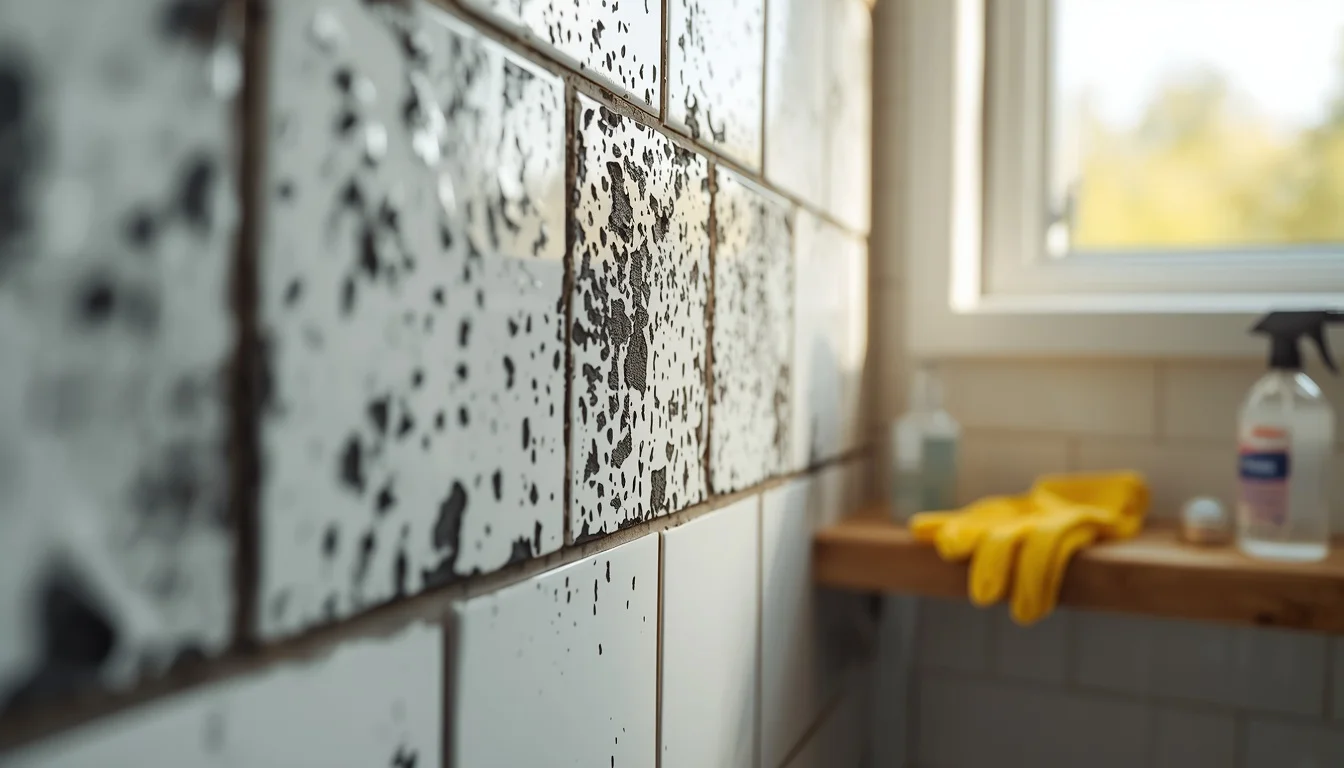
What I found was… not ideal. A deep, fuzzy patch of black mould had been quietly growing behind that caddy for who knows how long. It covered most of the grout lines and had crept up the sealant along the bottom edge of the shower tray. It smelled like a wet dog had been living in my wall.
I genuinely stood there for a minute not knowing where to start. I’d seen mould before — the odd pink spot on a shower curtain, a bit of grey around a window — but this felt different. This was a whole situation.
So I did what most people do: I Googled “how do you get rid of mould in bathroom” and got completely overwhelmed by conflicting advice. Some people said bleach only. Others said bleach makes it worse. Some said paint over it. (Please don’t paint over it.)
Over the next few weeks I tried a bunch of things, some of which worked brilliantly, some of which were a waste of time, and one of which accidentally bleached a patch of my bath mat. I’m going to tell you exactly what I found out, in the order that actually makes sense to do it.
2. Why Mould Keeps Coming Back in Bathrooms
Before you can actually get rid of mould properly, you need to understand why it’s there. Otherwise you’ll clean it once and be back to square one in three weeks. I know because that’s exactly what happened to me the first time.
The three things mould always needs:
- Moisture — showers, baths, leaking pipes, steam that doesn’t escape
- Warmth — bathrooms are usually warm, especially after a hot shower
- Something to feed on — grout, sealant, soap scum, painted walls, even cotton towels
Your bathroom ticks all three boxes multiple times a day. The only thing you can realistically control is the moisture. Everything else about the problem flows from that.
The difference between surface mould and structural mould
Surface mould sits on your tiles, grout, silicone sealant, or ceiling. It looks bad but it’s the one you can actually tackle yourself. Structural mould is inside your walls, under your bath panel, or growing on the building materials behind your tiles. That one needs a professional and sometimes a builder.
The test I use: if you clean the surface and it comes back in less than two weeks in exactly the same spot, it’s probably structural and you’re just treating the symptom.
3. What You Actually Need Before You Start
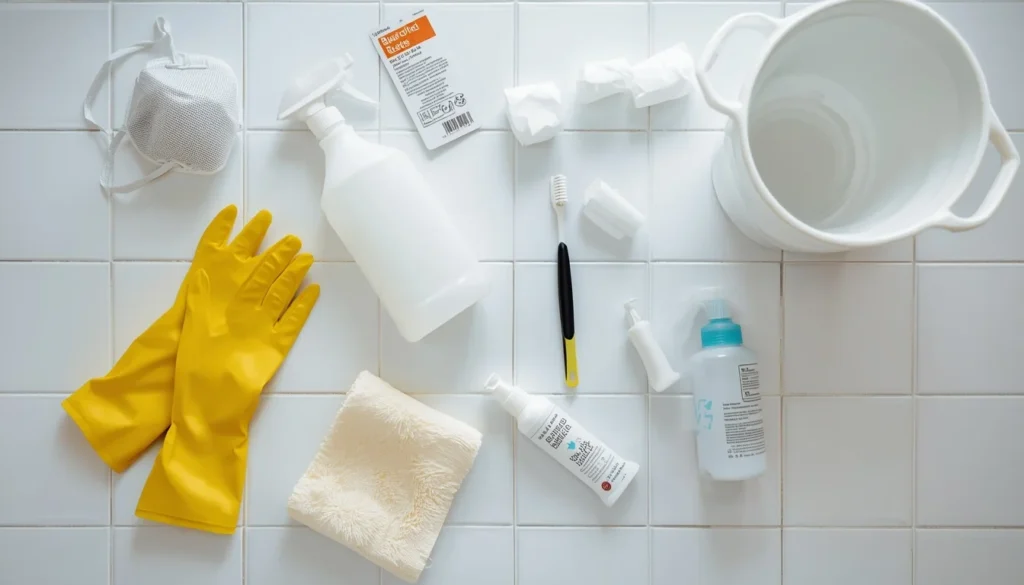
I made the mistake of starting without proper protection the first time. My eyes stung for hours afterward from bleach fumes in a poorly ventilated room. Here’s what you actually need:
Protection:
- Rubber gloves — proper ones that go up your forearms if possible
- An N95 or FFP2 mask — not a surgical mask, mould spores are small enough to pass right through those
- Old clothes you don’t mind potentially bleaching
- Eye protection if you’re using bleach or strong chemical sprays
Tools:
- Old toothbrush — genuinely the best tool for scrubbing grout lines
- Stiff-bristle grout brush (optional, but brilliant for bigger areas)
- Microfibre cloths — a few of them
- Spray bottles — decant your solutions into these for easier application
- A bowl for mixing solutions
Ventilation:
Open every window in the bathroom before you start. If there’s no window, run the extractor fan and leave the door open. Working with mould in a sealed room is genuinely bad for you, especially with chemical products.
4. How Do You Get Rid of Mould in Bathroom? 12 Real Methods Tested
Here’s where I’ll actually answer the core question. I’ve either used each of these myself or watched someone else use them and seen the result. I’m rating each one honestly.
Method 1: White Vinegar (My Go-To Starting Point)

White vinegar kills about 82% of mould species according to multiple cleaning studies, and unlike bleach, it actually penetrates porous surfaces like grout rather than just bleaching the surface colour.
Steps:
- Pour undiluted white vinegar into a spray bottle. Don’t dilute it — the acidity is the point.
- Spray directly onto mouldy areas and let it sit for at least one hour. Longer is better. I’ve left it for three hours on stubborn patches.
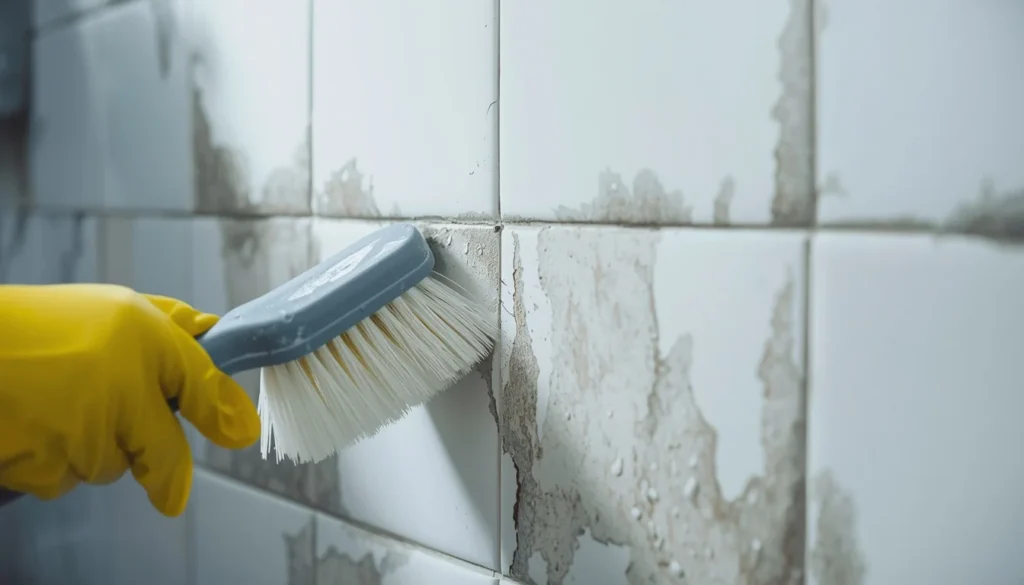
- Scrub with an old toothbrush, focusing on grout lines and corners.
- Wipe away with a damp microfibre cloth and dry completely.
- Repeat once a week as maintenance if your bathroom is prone to mould.
The smell is strong but it dissipates within a few hours. Honestly it fades much faster than bleach fumes.
My result: really good on surface tile mould and light grout mould. Less effective on deeply embedded black mould that’s been sitting there for months.
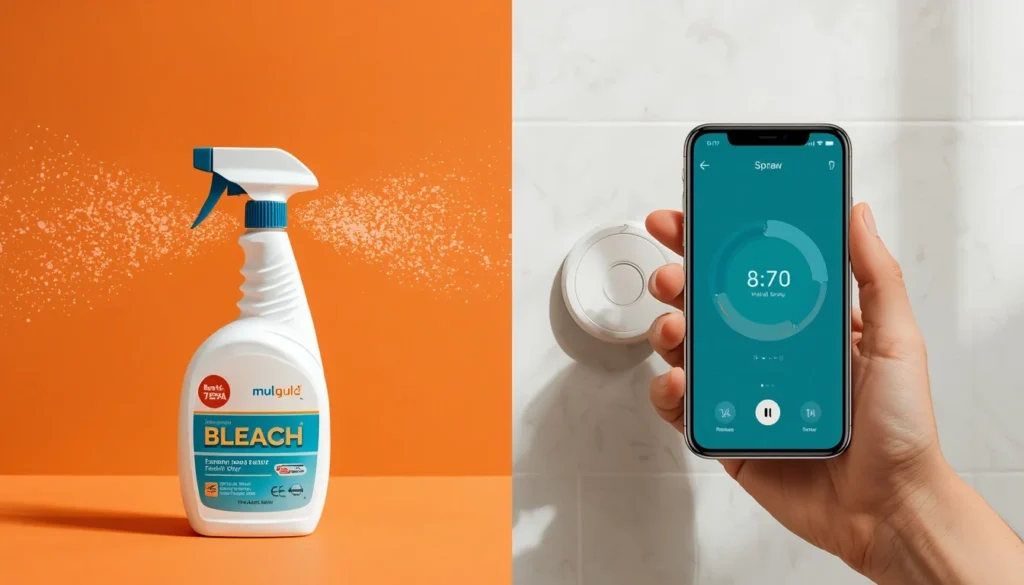
Method 2: Bleach Solution (for Stubborn Black Mould)
Bleach is everyone’s first instinct and it’s not wrong. The issue is that bleach on porous surfaces like grout mostly bleaches the colour of the mould rather than killing the roots. It still works well on non-porous surfaces: glazed tiles, baths, sinks, chrome fixtures.
Steps:
- Mix one part bleach with four parts water in a spray bottle.
- Ventilate the room properly — this is not negotiable.
- Spray and leave for 10–15 minutes.
- Scrub, rinse with clean water, and dry the surface.
- NEVER mix bleach with vinegar or any other cleaner. The fumes are toxic.
Use this as your heavy-hitter after vinegar hasn’t fully worked, not as your first step.
Method 3: Baking Soda Paste (Gentler but Effective)
Mix baking soda with just enough water to form a thick paste. Apply to mouldy areas, leave for 10 minutes, scrub with a toothbrush, and rinse. This is the one I’d use on natural stone tiles or any surface where bleach might cause damage. It also works as a mild abrasive to physically lift mould off surfaces.
Method 4: Tea Tree Oil Spray (Slower but Prevents Regrowth)
Add two teaspoons of tea tree oil to two cups of water in a spray bottle. Spray on mouldy areas and don’t rinse it off. Tea tree oil is antifungal, so the residue left on the surface actually discourages mould from coming back. It’s slower-acting than chemical solutions but it’s the best thing I’ve found for ongoing prevention. The smell is strong for about a day and then fades.
Method 5: Hydrogen Peroxide (3% Solution from a Pharmacy)
Pour 3% hydrogen peroxide into a spray bottle and apply to mouldy surfaces. Leave for ten minutes. It bubbles on contact with mould because it’s releasing oxygen to break down the mould cells. Scrub and wipe clean. This is a brilliant bleach alternative for coloured grout, since hydrogen peroxide is much less likely to cause discolouration than bleach. You can find it cheaply at any pharmacy.
Method 6: Purpose-Made Mould Sprays (HG, Dettol, Astonish)
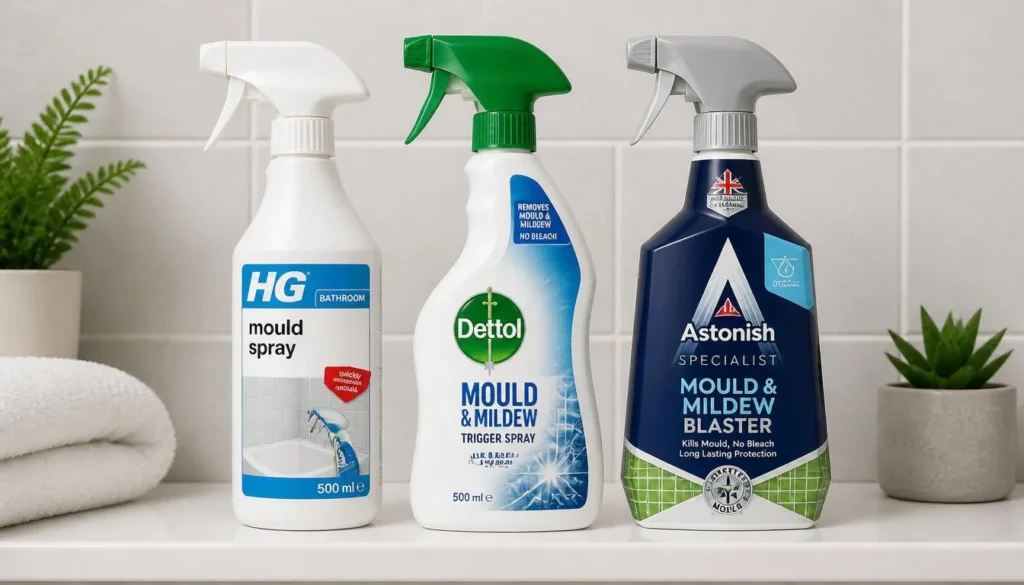
I tested three main commercial products alongside my DIY solutions. Honestly, HG Mould Spray is in a different league to the others — it cleared mould that had been sitting in my grout for months without scrubbing, just a spray and a 30-minute wait. The cost is higher than DIY, but if you have genuinely bad mould and don’t want to spend a weekend scrubbing, this is where to start.
Dettol Mould and Mildew is solid for ongoing maintenance but not strong enough for deep-set black mould. Astonish is budget-friendly and works fine on light surface mould.
Method 7: Steam Cleaner (Kills Mould Without Chemicals)
If you have access to a handheld steam cleaner — the kind that heats water to 100°C+ and pushes steam through a nozzle — this is genuinely one of the most effective methods for tile and grout mould. The heat kills mould cells on contact. It’s also the safest option if you’re sensitive to chemicals. Karcher and Polti both make good units. The downside is the upfront cost if you don’t own one.
Method 8: Replacing Silicone Sealant
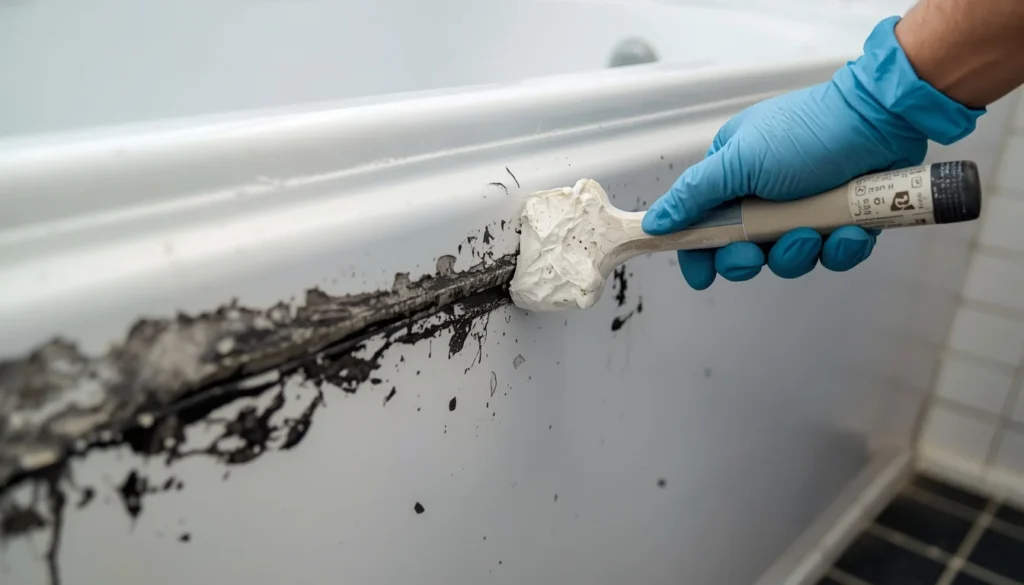
This one isn’t glamorous but it’s often the only real answer. Silicone sealant around your bath, shower tray, and basin is porous and once black mould has penetrated it fully, no cleaner in the world is going to remove it permanently. You’ll just bleach the surface temporarily.
Steps for replacing sealant:
- Use a silicone removal tool (or a sharp Stanley knife carefully) to cut and peel away the old sealant.
- Clean the surface thoroughly with methylated spirits and leave it completely dry — even a day or two in a warm room.
- Apply new anti-mould silicone sealant using a caulking gun. Wet your finger to smooth the bead.
- Leave it to cure for 24 hours before allowing water contact.
Anti-mould silicone costs a pound or two more than standard silicone but it’s worth every penny.
Method 9: Anti-Mould Paint for Ceilings
If your problem is mould on the bathroom ceiling, which is incredibly common since heat and steam rise, your best long-term solution after cleaning is to repaint with anti-mould paint. Dulux Bathroom Paint and Ronseal Mould Killer + Seal both contain biocides that actively prevent mould regrowth. First apply a mould-killing primer, then two coats of anti-mould bathroom paint. This is a weekend job but it genuinely lasts.
Method 10: Extractor Fan Upgrade
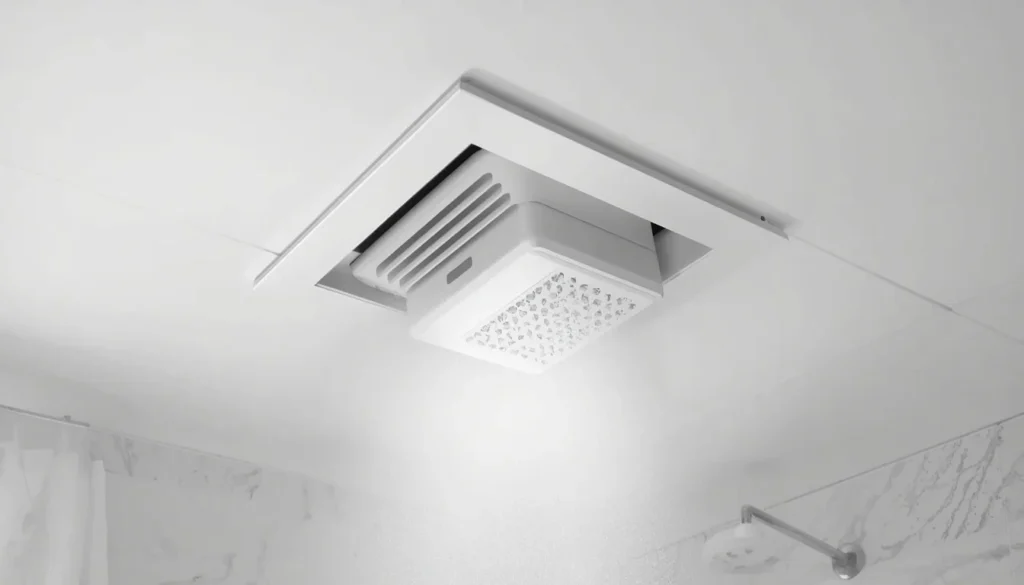
If your bathroom doesn’t have a window or has a cheap, underpowered fan, upgrading it is probably the single most impactful long-term investment you can make. Mould is almost always a ventilation problem more than a cleaning problem. A fan rated at 100+ m³/h for a standard bathroom will remove steam before it can settle on cold surfaces.
Manrose and Vent-Axia both make good mid-range options. The ones with timer settings that keep running for 15 minutes after you’ve turned off the light are especially useful.
Method 11: Dehumidifier in the Bathroom
Renting or buying a small dehumidifier and running it after showers can make a noticeable difference, especially in bathrooms where you genuinely can’t improve the ventilation (ground floor flats with no external wall, for example). The EcoAir DC12 and Pro Breeze 12L are both popular options. It’s not a first choice but for very damp bathrooms it can be the missing piece.
Method 12: Calling a Professional (When You Actually Should)
If the mould covers more than one square metre, if it keeps coming back within two weeks of cleaning, if it’s on multiple walls, or if you can see it pushing through paint or plaster, that’s the point where a professional damp surveyor or mould remediation specialist should be involved. They can check for the underlying cause — rising damp, a leaking pipe, failed waterproofing — rather than just treating the surface.
A basic damp survey costs £150–£300 in most of the UK and is often worth it before spending hundreds on decorating a room that will just mould again.
5. Method Comparison Table: How Do You Get Rid of Mould in Bathroom Fast vs Long-Term?
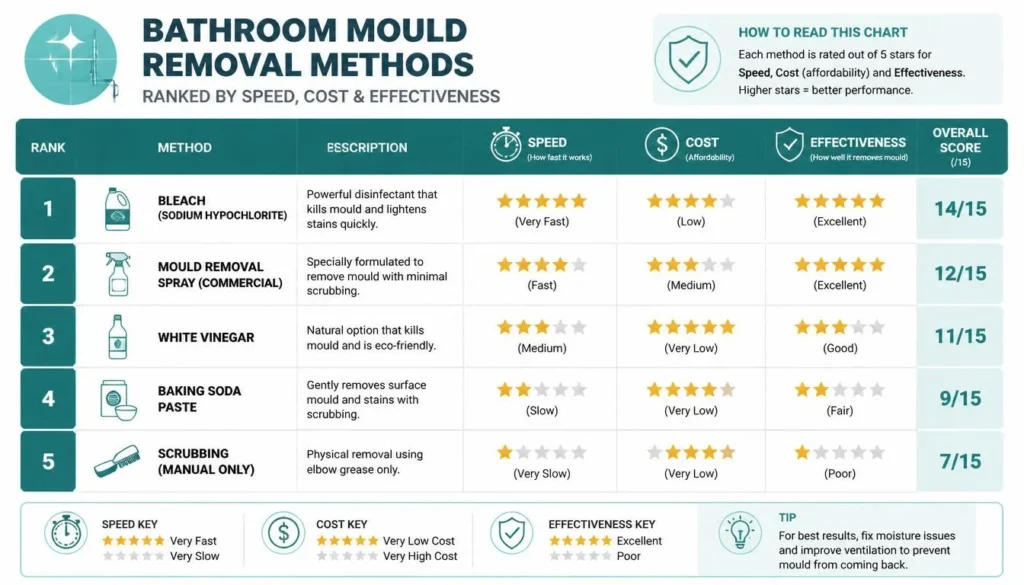
Here’s the honest breakdown of everything I tested, so you can pick the right approach for your specific situation:
| Method | Effort | Cost | Kills Mould? | Prevents Return? | Best For | Rated /5 |
| White Vinegar | Low | Very low £1–2 | Yes (82%) | Partly | Light/medium surface mould | ★★★★☆ |
| Bleach Solution | Medium | Very low £1–3 | Surface yes | No | Non-porous tiles and fixtures | ★★★★☆ |
| Baking Soda Paste | Medium | Very low £1 | Partly | No | Delicate surfaces, natural stone | ★★★☆☆ |
| Tea Tree Oil | Low | Low £5–10 | Yes | Yes (best) | Ongoing prevention | ★★★★★ |
| Hydrogen Peroxide | Low | Low £2–4 | Yes | Partly | Coloured grout, coloured surfaces | ★★★★☆ |
| HG Mould Spray | Low | Med £8–12 | Yes | Partly | Worst black mould, fast results | ★★★★★ |
| Steam Cleaner | Med | High £80–200 | Yes (heat) | No | Chemical-free deep clean | ★★★★☆ |
| Replace Sealant | High | Low £5–15 | Yes (new) | Yes | Permanently moulded silicone | ★★★★★ |
| Anti-Mould Paint | High | Med £20–50 | Yes (primer) | Yes | Ceiling and wall mould long-term | ★★★★☆ |
| Extractor Fan Upgrade | High | High £60–150 | No (prevents) | Yes (best) | Root cause: poor ventilation | ★★★★★ |
| Dehumidifier | Low | High £60–120 | No | Partly | High-damp no-window bathrooms | ★★★☆☆ |
| Professional Surveyor | None | High £150+ | N/A | Yes | Severe/structural mould | ★★★★★ |
6. Mistakes That Make Bathroom Mould Worse (I Made Most of These)
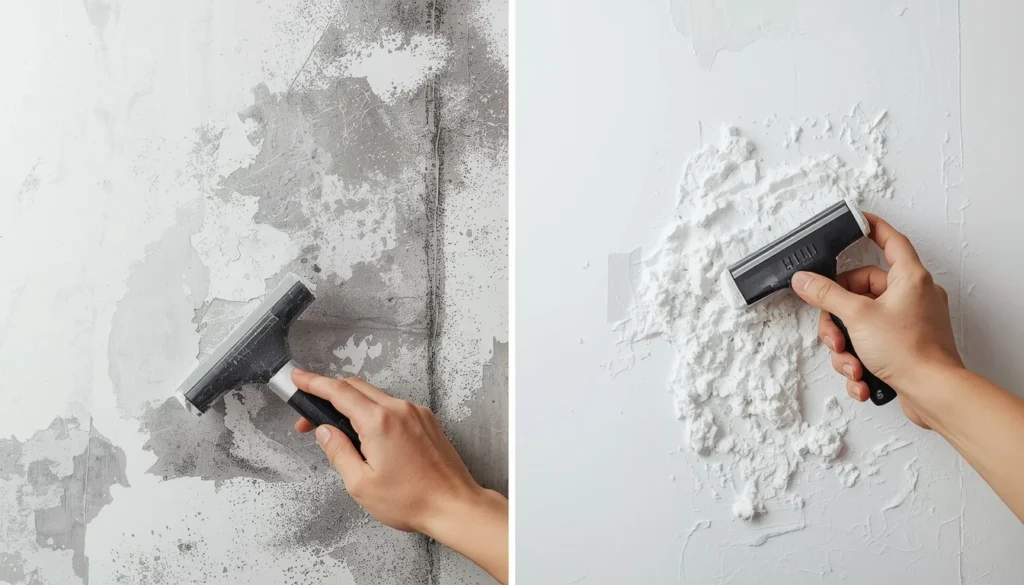
Mistake 1 — Painting straight over it: Mould will push straight through ordinary paint within weeks. You will be able to see it again and the paint will start bubbling. Always treat and kill the mould first, then prime with an anti-mould primer before repainting.
Mistake 2 — Not drying the surface after cleaning: Wiping mould off a surface and leaving it damp just invites it straight back. After any cleaning session, dry the surface with a clean cloth and if possible use a fan or hairdryer (on a low setting, keeping it away from water) to thoroughly dry grout lines.
Mistake 3 — Mixing cleaning products: I can’t stress this enough. Bleach + vinegar = chlorine gas. Bleach + ammonia-based cleaners = same problem. Always rinse between different products and never combine them in the same spray bottle or bucket.
Mistake 4 — Only treating visible mould: Mould you can see is usually part of a bigger colony you can’t. Treat an area slightly larger than what’s visibly affected to catch the early-stage growth around the edges.
Mistake 5 — Using a normal face mask: I wore a flimsy paper mask on my first cleaning session and could taste the bleach fumes through it. Use an N95 or FFP2. They’re widely available and cost about £1 each.
Mistake 6 — Assuming it’s just cosmetic: Black mould in bathrooms is usually Cladosporium or Aspergillus, both of which can trigger or worsen respiratory issues, allergies, and asthma with prolonged exposure. Take it seriously.
7. How to Stop Bathroom Mould Coming Back
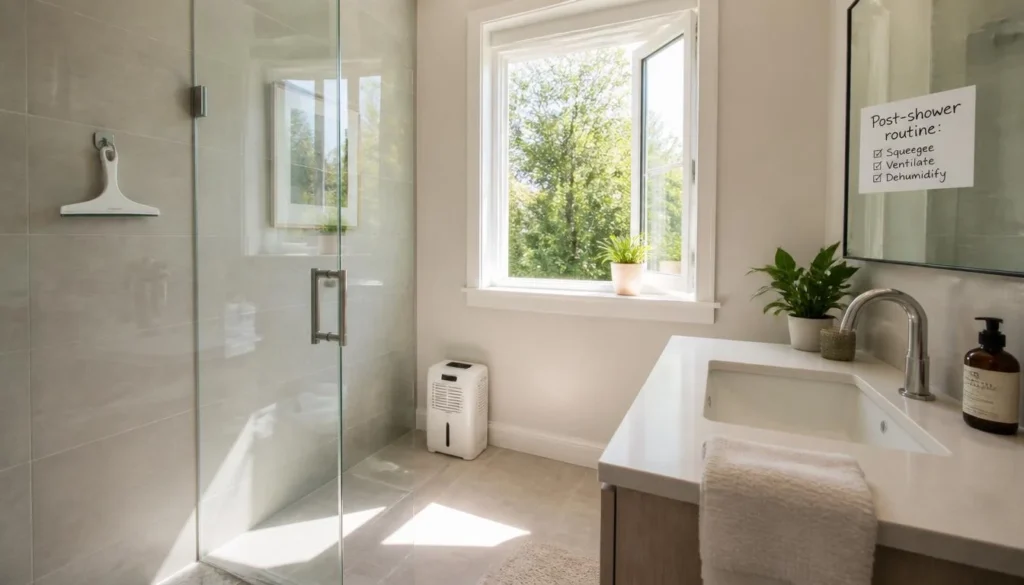
Getting rid of mould is one thing. Keeping it gone is the part most guides skip over. Here’s the actual post-shower routine that’s kept my bathroom clean for the past six months:
Daily (takes 3 minutes):
- Squeegee the shower walls after every use. This removes the standing water that mould needs to get started.
- Leave the shower door or curtain open after use so air can circulate inside.
- Run the extractor fan for at least 15 minutes after a shower.
- If there’s a window, open it even just a crack while showering.
Weekly:
- Spray tile and grout surfaces with white vinegar or a diluted tea tree oil solution and wipe off.
- Check behind and under any wall-mounted accessories where water can pool unseen.
- Wash shower curtains regularly — they’re a primary mould habitat.
Monthly:
- Check silicone sealant for any cracks or dark spots forming at the edges.
- Deep clean grout lines with a paste solution.
- Check extractor fan is functioning properly — hold a tissue up to it and it should pull the tissue toward the grille.
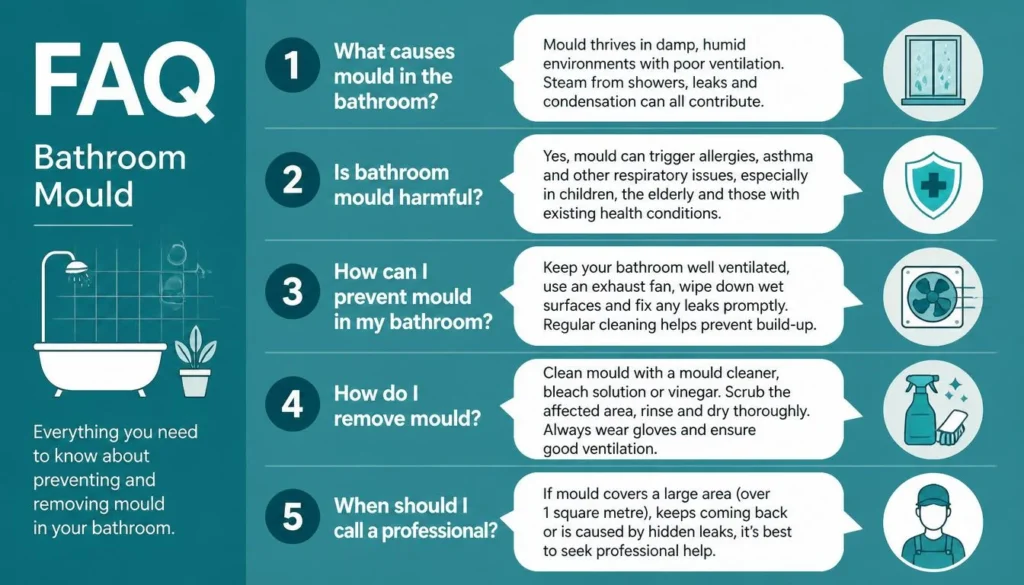
8. Quick Answers: Your Most-Asked Questions About Bathroom Mould
(This section is designed to answer the questions voice search, Google Featured Snippets, and AI assistants pull directly — so the answers are kept clear and direct.)
How do you get rid of mould in bathroom quickly?
Spray undiluted white vinegar or a purpose-made mould spray like HG directly onto the mould, leave for 30–60 minutes, scrub with an old toothbrush, and wipe clean. For the fastest visible result on tiles, diluted bleach (1:4) works in 10–15 minutes on non-porous surfaces.
Does bleach actually kill bathroom mould?
On non-porous surfaces like glazed tiles and chrome, yes. On porous surfaces like grout, it bleaches the colour but doesn’t fully penetrate to kill the roots. White vinegar, hydrogen peroxide, or tea tree oil penetrate better on porous materials.
Is black mould in bathrooms dangerous?
Black mould in bathrooms is most commonly Cladosporium or Aspergillus niger, not the rarer toxic Stachybotrys chartarum. However, even common bathroom moulds can worsen asthma, trigger allergies, and cause respiratory irritation. Treat it promptly, wear a proper mask during cleaning, and see a GP if you’ve had prolonged exposure and are experiencing respiratory symptoms.
What is the best product to remove black mould from bathroom?
Based on real-world testing, HG Mould Spray consistently outperforms other products for deep-set black mould without scrubbing. For a DIY solution, undiluted white vinegar left for a minimum of one hour is the most cost-effective option.
How do you get rid of mould in bathroom ceiling?
Use a long-handled sponge mop or spray bottle and a step ladder to apply mould killer to the ceiling. Wear eye protection as drips are inevitable. After killing and removing the mould, repaint with an anti-mould ceiling paint to prevent regrowth.
Can I get rid of bathroom mould myself or do I need a professional?
Most bathroom surface mould can be tackled yourself with the right products and protection. Call a professional if: the affected area exceeds one square metre, it keeps returning within two weeks, or you see signs of structural damp (bubbling plaster, tide marks, soft walls).
9. New Trends in Bathroom Mould Removal for 2026
The bathroom mould removal space has actually changed quite a bit going into 2026. A few things worth knowing:
Enzyme-Based Mould Cleaners
A new category of enzyme-based cleaners (brands like Bio Mould Out are starting to appear in UK supermarkets) break down mould at a biological level rather than using bleach or acids. Early results from user reviews suggest they’re gentler on surfaces and equally effective for light mould. Worth watching.
Smart Humidity Sensors
Small, cheap Zigbee or Bluetooth humidity sensors (Xiaomi make a popular one for around £10) that sit in your bathroom and send an alert to your phone when humidity exceeds a set threshold. I got one last year and it changed how I think about my post-shower routine — seeing the data makes you actually do something about it.
Anti-Mould Tile Grout
If you’re renovating, anti-mould grout (Mapei and BAL both make good versions) contains biocides mixed in at manufacture. This is becoming standard for new bathroom builds rather than a premium add-on.
UV-C Bathroom Fans
Some extractor fan manufacturers are now integrating UV-C light emitters into their fans. UV-C light kills airborne mould spores in the extracted air. It’s a premium product at the moment but the prices are dropping.
10. What I Actually Do Now (And What Made the Biggest Difference)

Six months after that grim Saturday morning with the shower caddy, my bathroom is genuinely mould-free. Here’s the honest list of what actually made the difference, in order of impact:
- Replacing the silicone sealant — this was the single biggest visual improvement. Nothing was going to fix what was in that sealant.
- Upgrading the extractor fan — went from a barely-functioning 60-year-old unit to a Vent-Axia timer model. The condensation after showers is visibly different now.
- The squeegee habit — took about a week to get used to but genuinely takes two minutes and removes most of the water that would otherwise sit on tiles.
- White vinegar weekly spray — takes 30 seconds and just keeps the surface clean between deeper cleans.
- Tea tree oil preventative spray — I leave this on without rinsing once a week on the grout and sealant areas.
The cleaning products honestly mattered less than the ventilation and the squeegee habit. If you only do two things from this guide, upgrade your fan and start squeegeeing after showers. Everything else is secondary to solving the root cause of why mould grows in the first place.
Hope your Saturday morning discovery is less dramatic than mine was.
You May Also Like These Posts
→ Biophilic Bathroom Design Ideas
→ Decorating Living Room Christmas Ideas